
Did you know that the average person interacts with their living room centerpiece over 50 times each week? This surprising statistic reveals how much potential lies in transforming this everyday piece of furniture.
Imagine a versatile surface that adapts to your changing needs throughout the day. With a simple lifting mechanism, you can elevate from a standard height to a comfortable working or dining level. This eliminates the need to hunch over while using your laptop or enjoying meals.
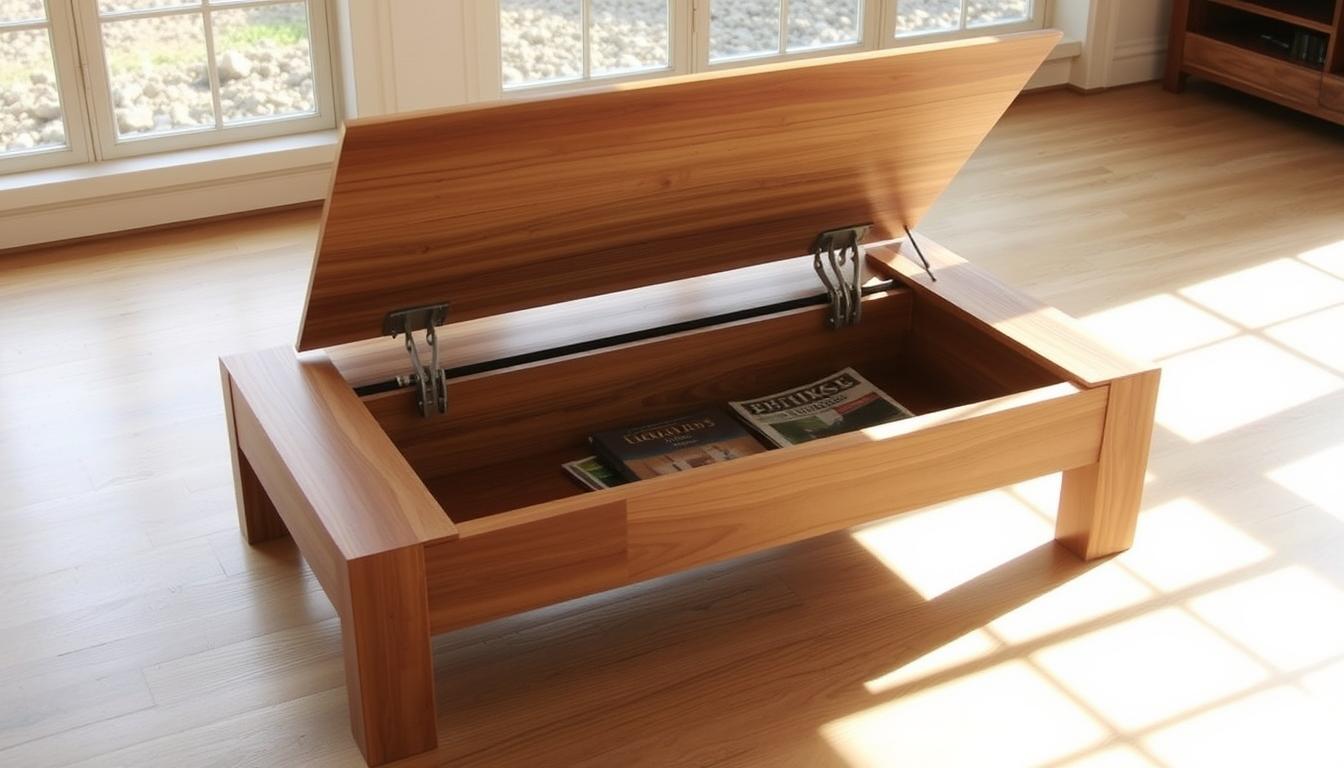
The clever design incorporates discreet compartments that keep your space organized. You can conceal remote controls, game controllers, and other items that typically create clutter. This creates a clean, minimalist aesthetic in your home.
Building this multifunctional piece offers the satisfaction of creating custom furniture tailored to your exact requirements. You gain a versatile solution that serves multiple purposes while potentially saving money compared to store-bought alternatives.
Key Takeaways
- Transform your living space with a versatile piece that combines elegant design and practical storage
- Create an adjustable surface perfect for working, dining, or entertaining without discomfort
- Build custom furniture tailored to your specific space requirements and style preferences
- Keep your home organized with discreet compartments that conceal everyday items
- Develop valuable woodworking skills while creating a functional centerpiece for your room
- Enjoy the satisfaction of building a multifunctional solution that adapts to daily activities
- Save money compared to purchasing similar furniture from retail stores
Introduction: Discover the Vision Behind Your Project
What if your main living area centerpiece could transform to meet your changing daily activities? This innovative approach reimagines how we interact with our most used furniture. The vision combines elegant design with practical solutions for modern living.

Why Build a DIY Pop Up Coffee Table?
Traditional surfaces often force uncomfortable positions during meals or work sessions. A lift mechanism provides immediate relief from back strain. You gain an adjustable surface that adapts to your needs throughout the day.
Building your own solution proves more affordable than store-bought alternatives. You maintain complete control over dimensions and style preferences. This ensures perfect integration with your existing room layout.
The Benefits of Hidden Storage and Multifunctionality
Discreet compartments solve the universal problem of living room clutter. Remote controls, tablets, and game controllers find dedicated homes. Your space maintains a clean, organized appearance while keeping essentials accessible.
The multifunctional design eliminates the need for multiple furniture pieces. Your centerpiece transforms into a dining surface, workspace, or entertainment hub. This adaptable functionality makes the investment truly valuable for busy households.
Planning Your Project
Proper preparation transforms a complex furniture project into a manageable, step-by-step process. A successful build starts long before you make the first cut. This phase ensures your final piece fits perfectly in your home and functions exactly as you envision.
Careful planning prevents wasted materials and frustration. You will create a custom solution tailored to your specific needs and space.
Gathering Materials, Tools, and Inspiration
Your material selection forms the foundation of your project. Start with a stable panel materials like 3/4-inch plywood or MDF for the main case. You will need specific cuts for the long sides, short sides, and top.

Essential tools include a circular saw for initial breakdown and a table saw for precision. Hardwood is critical for the lift mechanism’s cantilever hinge. Do not forget hardware like screws, bolts, and drawer slide components.
Gather ideas from various styles before you buy. This helps ensure all your design decisions are cohesive.
| Component | Quantity | Dimensions (inches) | Material |
|---|---|---|---|
| Long Side Panel | 2 | 16 x 40 | 3/4″ Plywood |
| Short Side Panel | 2 | 16 x 24 | 3/4″ Plywood |
| Top Panel | 1 | 28 x 44 | 3/4″ Plywood |
Measure twice, cut once. This old adage holds profound truth for woodworking, where precision in planning saves both time and resources.
Assessing Your Space and Design Requirements
Accurate measurements of your room are non-negotiable. Consider the traffic flow around where the table will sit. This assessment influences the final dimensions and the decision to add caster wheels for mobility.
Define your storage needs clearly. How many compartments do you require? What will you store? Answering these questions shapes the internal design.
Finally, calculate the lift height. Ensure it provides a comfortable surface for dining or working when raised. Adjust all measurements to fit your unique space.
Design Inspiration and Considerations
Selecting a specific design style transforms your functional build into a personalized statement piece. Your choice determines how the lift mechanism integrates and how storage compartments enhance the overall look.

Style Options: Modern, Rustic, and Industrial Chic
Modern minimalist tables feature clean lines and monochromatic schemes. The lift feature blends seamlessly into the sleek aesthetic.
Rustic farmhouse design celebrates wood with distressed finishes. Visible iron hardware adds character while maintaining functionality.
Industrial chic style combines metal frames with wood surfaces. This approach highlights the mechanical feature as a design element.
Integrating Functionality with Aesthetic Appeal
Your coffee tables should complement your living area’s existing furniture. Consider how the piece will fit within your room’s space and color scheme.
Balance practical needs with visual harmony. Ensure every design decision enhances both style and utility for your living environment.
DIY Pop Up Coffee Table: Hidden Storage And Function In One
The actual building process begins with transforming raw materials into precise components. This step-by-step approach ensures each part fits perfectly within your final furniture piece.
Step-by-Step Construction Process Overview
Start by breaking down full plywood sheets using a circular saw for initial cuts. Then refine each panel with a table saw for exact dimensions. This first step establishes accuracy for the entire project.
Build the moving section first by doubling up panels for thickness. Use a nail gun for temporary holds while glue sets, then add clamps. Construct the fixed part similarly, using pocket hole joints for clean connections.
Add a center divider to create hidden space for electrical components. Install tapered pieces along the top edge and drill precise holes for cord access. This step integrates functionality into your design.
Tips for Precise Cuts and Secure Joints
Measure twice before every cut to ensure accuracy. Use a straightedge guide with your circular saw for clean lines. Make sure your table saw blade stays perfectly square throughout the process.
Combine multiple fastening methods for durable joints. Wood glue provides long-term strength while pocket hole screws offer hidden connections. Strategic nail placement gives immediate holding power during assembly.
Pay special attention to drawer slide alignment and lift mechanism operation. Make sure all components move smoothly before final assembly. Allow adequate drying time between finishing steps for professional results.
Integrating Modern Technology Into Your Build
Today’s furniture can do more than just hold your coffee cup—it can become the technological hub of your living space. Modern enhancements transform your project from basic furniture into a smart centerpiece for your home.

Incorporating Electronics and Actuator Mechanisms
Start by installing the actuator mechanism in the center of your table. Secure the motor end to the bottom panel using a nut and bolt. Use a specialized bracket with a 1/8-inch plate to attach the opposite end to the moving section.
Wire the actuator to a 4-channel wireless receiver for remote control operation. This setup allows you to raise and lower the surface with convenience. The lift function becomes seamless with proper electronic integration.
Enhancing Your Table with LED Lighting and Wireless Features
Install LED strips within dedicated channels for a clean, professional appearance. Consider using a standalone LED kit for individual color control. This feature adds ambiance customization to your living area.
Built-in charging stations with USB ports or wireless pads keep devices powered. Bluetooth speakers integrated into the base create immersive audio experiences. These wireless features eliminate cable clutter throughout your home.
| Feature | Installation Complexity | Required Components | Functionality Benefit |
|---|---|---|---|
| Actuator Lift System | Medium | Actuator, wireless receiver, bracket | Remote-controlled height adjustment |
| LED Lighting | Low | LED strips, channels, controller | Ambiance customization and task lighting |
| Wireless Charging | Low | Charging pad, USB ports | Convenient device charging |
| Bluetooth Audio | Medium | Speakers, amplifier, battery | Integrated sound system |
Smart home control panels can be added to the surface for managing your environment. Hidden compartments with soft linings protect tablets and laptops. The top surface becomes multifunctional with these integrated technologies.
Consider adding environmental sensors or mini projectors for advanced functionality. These features elevate your furniture piece beyond traditional storage solutions. Your creation becomes a true centerpiece of modern living.
Construction Techniques and Essential Tools
The right cutting techniques and tool selection can make the difference between a frustrating experience and a satisfying finished piece. Proper tool handling ensures your furniture project meets professional standards.
Using Circular Saw and Table Saw Effectively
Begin by breaking down full plywood sheets with your circular saw. This approach works well in limited shop spaces where large panels prove challenging to maneuver.
Take your rough cuts to the table saw for precision refinement. This tool produces clean, straight edges that fit together perfectly. While you can complete entire projects with just a circular saw, the table saw saves significant time.
| Tool | Primary Function | Precision Level | Best For |
|---|---|---|---|
| Circular Saw | Initial breakdown | Medium | Portable cutting |
| Table Saw | Precision cuts | High | Repetitive identical pieces |
| Miter Saw | Angled cuts | High | Clean corner joints |

Determine drawer opening measurements before assembling the four main panels. Cut holes first to ensure perfect alignment. This technique guarantees both openings center exactly when drawers slide through both sides.
Select your wood carefully for optimal results. Pine or birch plywood offer forgiveness for beginners. Hardwoods like oak demand sharper blades but deliver superior longevity.
Make sure your circular saw has a sharp blade. Use a straightedge guide for visible edges that affect the final aesthetic. Clean cuts create professional-looking joints.
Budget $100-$300 for materials and hardware. Your wood choice and lift mechanism represent the primary cost variables. Essential tools include saws, drill, sander, clamps, and measuring tape.
Finishing Touches for a Professional Look
Your project’s visual appeal and durability depend heavily on the final finishing steps you implement. These techniques transform basic construction into a polished piece that rivals store-bought furniture.
Applying Primer, Stain, and Protective Vinyl
Begin by thoroughly sanding all wood surfaces to create a smooth foundation. Apply bondo filler to any imperfections or nail holes that might show through your final finish.

The first coat of primer dramatically changes your project’s appearance. White gloss oil-based paint provides a durable, wipeable surface that withstands daily use.
For vinyl application, ensure the surface is completely clean and free from contaminants. Work methodically from one side to the next, smoothing as you progress to eliminate air bubbles.
This specialized vinyl offers superior thickness compared to standard contact paper. It provides easier installation and a premium textured finish for your coffee table.
Before final assembly, stain and varnish all visible wood components. Consider convenient 2-in-1 products that combine stain and protective coating in a single application.
Add magnetic catches to cover panels for easy access to hidden compartments. Wrap the cover plate with matching material so access points blend seamlessly into your table‘s surface.
Use a double-gang cut-in ring for electrical plates or magnetic mounting systems. These diy techniques create a clean aesthetic without visible screws.
Wood glue applications throughout assembly add structural strength beyond mechanical fasteners. This ensures your coffee table maintains its professional look through years of regular use.
Creative Customization and Additional Features
Beyond the basic construction, numerous opportunities exist to enhance your piece with unique features and custom elements. These modifications allow you to create furniture that perfectly matches your specific requirements and personal style.
Exploring Custom Design Variations
Consider nested tables with smaller side pieces that tuck beneath the main surface. This design provides extra surfaces during entertaining while maintaining a compact footprint.
Fold-out extensions transform your piece into a mini dining surface. Proper hinge placement and locking support legs ensure secure weight distribution at any height.
Ottoman hybrids combine comfort with practicality through removable tops. Soft edges offer safety while maintaining elegant functionality in your living room.
Adding Extra Storage and Hidden Compartments
Create ledges for drawer slides by joining wood pieces to the interior framework. This technique ensures smooth operation for your concealed storage solutions.
Add stoppers to prevent drawer tipping when partially opened. These small additions significantly improve safety and accessibility.
Consider mobility features like caster wheels mounted on triangular corner supports. This allows easy repositioning within your space while maintaining stability.
Conclusion
Completing this project marks a significant achievement in custom furniture creation. You have successfully built a versatile centerpiece that perfectly suits your home.
Your new coffee table offers an impressive blend of style and smart functionality. The smooth lift mechanism transforms your living room from a relaxing space into a dynamic area for work or dining.
This unique piece of furniture stands as a testament to your skills and vision. It enhances daily life with its clever features and custom fit.
You can now enjoy the satisfaction of a project well done. Look ahead to your next creative challenge with confidence.