
A single piece of designer furniture from a renowned Swedish house can cost over $2,700. This price tag makes high-end style feel out of reach for many. However, a stunning alternative exists that captures the same elegant look for a fraction of the cost.
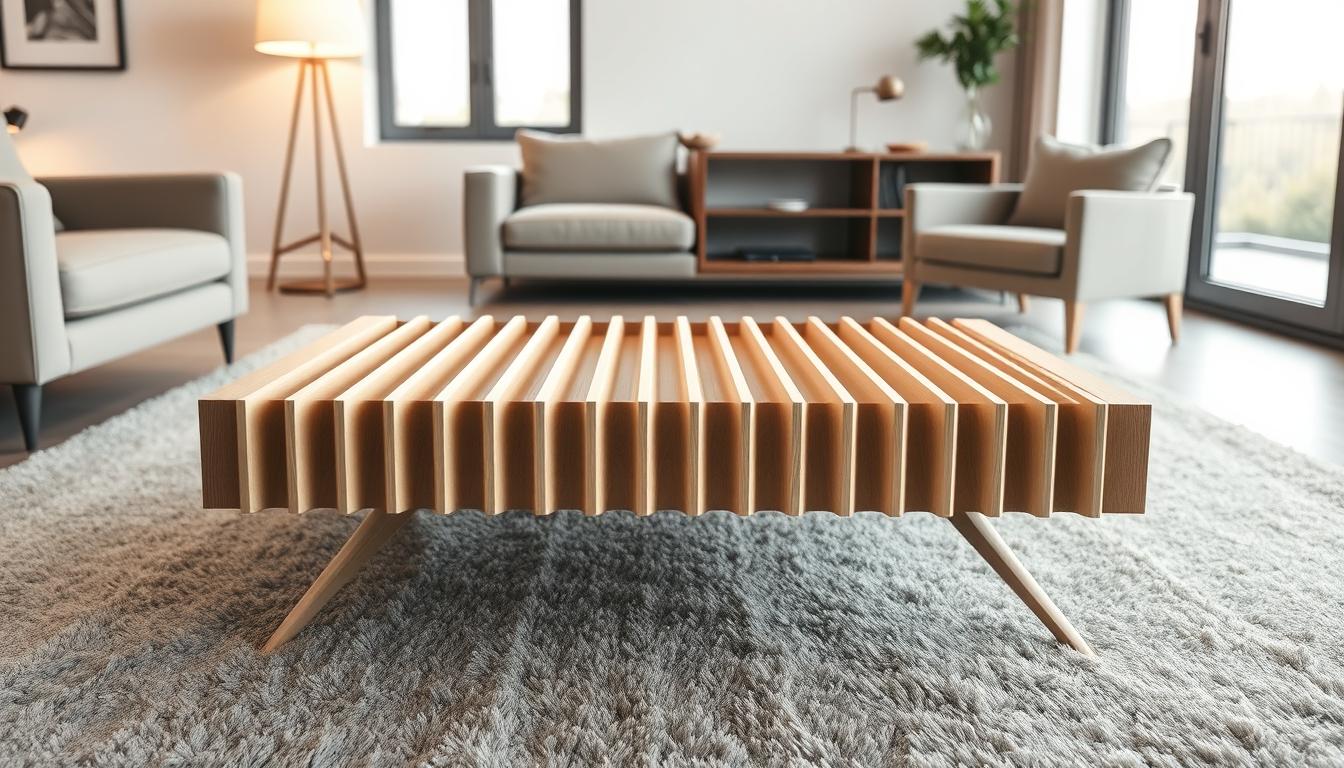
The reeded or fluted furniture trend is currently dominating modern interior design. This style adds significant texture and architectural depth to any living area. Its appeal is not new; the look has historical roots dating back to ancient Greek architecture.
Creating your own version is an achievable project. With an approximate material cost of around $300 and a weekend of work, you can construct a beautiful centerpiece for your home. This guide will walk you through the entire process, from understanding the trend’s appeal to the final build.
You will discover how to achieve a custom, high-end aesthetic without the luxury price. This project offers the satisfaction of building a unique statement piece that perfectly fits your space and style.
Key Takeaways
- The fluted furniture trend adds significant texture and visual interest to modern interiors.
- Building your own version can save thousands compared to purchasing designer pieces.
- Fluting is a timeless architectural detail with roots in ancient Greek design.
- This project is accessible, with a realistic material cost and time investment.
- Creating a custom piece allows for personalization and a great sense of accomplishment.
Materials and Tools Overview
Before starting construction, ensure you have all necessary supplies organized for efficient workflow. Proper preparation prevents delays and ensures professional results. This section details the essential components required.

Wood, Dowels, and Fasteners
The primary materials include two 36-inch diameter round boards for the top and base. These wood pieces form the main structure. You’ll need approximately 200 half-inch wooden dowels to create the fluted effect.
Fastening systems are crucial for stability. Use Figure 8 fasteners or L brackets with various screw sizes. Titebond wood glue provides strong adhesion between components.
| Material Type | Specific Items | Quantity | Purpose |
|---|---|---|---|
| Wood Components | 36″ round boards, 2×4 common board | 2 pieces, 8 feet | Table structure and frame |
| Fasteners | 2.5″ wood screws, 1″ flathead screws | Various quantities | Assembly and joining |
| Adhesives | Titebond wood glue | 1 bottle | Dowel attachment |
| Finishing Supplies | 220 grit sandpaper, wood conditioner | As needed | Surface preparation |
Essential Tools and Equipment
Power tools make this project manageable. A miter saw ensures precise dowel cuts. The power drill handles screw driving and hole creation.
Optional tools like a Kreg jig can simplify frame assembly. Safety equipment including goggles is non-negotiable. Proper tools transform raw materials into finished furniture.
Design Inspiration and Trend Background
The appeal of fluted furniture extends far beyond modern catalogs, reaching back to classical antiquity for its foundational principles. This style connects your project to a timeless architectural language.

Modern Influences and Historical Fluting
Fluting graced ancient Greek columns, adding strength and rhythm to stone structures. Centuries later, Scandinavian designers revived this detail for contemporary homes.
Brands like Asplund Furniture showcase how these classical lines translate into stunning modern pieces. The trend has gained mainstream visibility through retailers, confirming its broad appeal.
How Fluted Elements Enhance Your Living Room
Vertical grooves create captivating light and shadow patterns throughout the day. This adds significant texture and depth to a minimalist space.
The reeded look provides sophisticated architectural interest without clutter. It serves as a versatile anchor for your room’s overall aesthetic.
| Aspect | Historical Application | Modern Interpretation |
|---|---|---|
| Primary Use | Architectural columns (structural) | Furniture and wall panels (decorative) |
| Material | Stone, Marble | Wood, MDF, Metal |
| Visual Effect | Grandeur, Strength | Texture, Sophistication |
DIY Fluted Coffee Table: Trendy Design You Can Build
Proper groundwork is the foundation for any successful furniture construction endeavor. This initial phase focuses on planning and preparation, which are crucial for a smooth building process.

Begin by researching various online guides. Learning from the experiences of others helps refine your approach and avoid common errors.
Understanding the Project Layout
Establish clear parameters before starting. Decide on the final height, typically between 14 and 18 inches, to match your existing furniture.
Consider the scale of your room. A large sectional sofa pairs well with a 40-inch diameter, while a smaller sofa needs at least 28 inches.
Preparing Your Workspace
A flat, level surface is non-negotiable. This ensures internal support frames are square at ninety-degree angles for maximum stability.
Organize all materials within easy reach. A clean, dedicated area prevents accidents and streamlines the entire process.
Gathering Accurate Measurements
Precision is paramount, especially for dowel lengths. Measurements must be exact to within a fraction of an inch.
Dowel length miscalculations lead to significant issues. Pieces that are too short will not secure properly, while those too long will not fit.
| Planning Aspect | Key Consideration | Recommended Action |
|---|---|---|
| Table Height | Match existing furniture scale | Choose 14″, 16″, or 18″ |
| Table Diameter | Room size and sofa type | 28″ minimum, 40″ for large sectionals |
| Dowel Quantity | Desired visual density | 42 to 200 for a 36″ round |
| Total Time | Active work and drying | Plan for 10 hours over 2 days |
Step-by-Step Build Instructions
Transforming raw materials into a finished piece requires methodical assembly steps. This phase turns your planning into physical reality through careful execution.
Following the correct sequence ensures structural integrity and professional appearance. Each action builds upon the previous one systematically.

Assembling the Inner Support Frame
Begin by cutting your lumber into specific lengths. You’ll need four pieces at 11 inches and four at 12 inches for standard height.
Assemble two rectangular frames using 2.5-inch wood screws. Drive two screws per joint for maximum stability. Work on a level surface to maintain square corners.
Attaching the Top and Base with Precision
Create countersink holes using a 5/8-inch Forstner bit. This allows Figure 8 fasteners to sit flush against the frame.
Position support frames approximately one-third inward from the edges. Mark positions carefully before attachment. Verify perfect levelness from all sides before final screw installation.
Integrating Dowels for the Signature Fluted Look
Cut wooden dowels to exact specifications—typically 12 inches for a 14-inch table. Measure against a straight edge for accuracy.
Apply adhesive to both ends of each dowel before insertion. Wipe excess immediately to prevent staining issues. Continue around the entire circumference until complete.
| Construction Step | Key Action | Critical Detail |
|---|---|---|
| Frame Assembly | Cut and join lumber pieces | Use 2 screws per joint on level surface |
| Round Attachment | Position and secure top and base | Verify levelness before final screws |
| Dowel Installation | Measure, cut, and insert vertical elements | Apply glue carefully; wipe excess immediately |
Precision in measurement translates directly to stability in the final product.
The final dowel may require slight sanding for perfect fit. Some builders use pin nailers for additional security without visible holes.
Wood Preparation and Finishing Techniques
Achieving a professional finish requires careful attention to sanding, staining, and sealing techniques. This phase transforms your construction into a polished piece that showcases craftsmanship.
Sanding, Staining, and Sealing Tips
Begin by thoroughly sanding all surfaces with 220 grit sandpaper. Apply even pressure across the top, bottom, and individual components. This creates a smooth base for stain absorption.
Apply wood conditioner before staining. This crucial step prevents blotchy appearance and ensures even color distribution. Many beginners skip this but regret the uneven results.
Choose your stain color carefully. Popular options include Minwax Early American or Weather Oak. Apply in manageable sections using a brush or clean rag.
Allow the stain to penetrate for five minutes before wiping excess. The pre-conditioned wood will show noticeably smoother application.

Address any glue spots that resisted stain absorption. Use a small brush with semi-transparent product for touch-ups. Check all edges and gaps between components.
Many builders find that wood glue naturally fills small spaces during assembly. This can eliminate the need for separate wood filler applications.
| Finishing Step | Product Options | Application Time | Key Benefit |
|---|---|---|---|
| Surface Preparation | 220 grit sandpaper | 30-45 minutes | Smooth base for staining |
| Conditioning | Wood conditioner | 15 minutes + dry time | Prevents blotchy stain |
| Staining | Minwax Early American | 5 minutes per section | Enhanced wood grain |
| Sealing | Polycrylic satin finish | 3 coats with drying | Durable protection |
The final finish reveals the true quality of the construction beneath.
Apply three coats of polycrylic in satin finish for protection. Alternatively, use matte spray to avoid brush marks. Allow overnight drying between stain and sealer applications.
For comprehensive guidance on furniture projects, explore resources at diycoffeetable.com. Proper finishing ensures your coffee table maintains its beautiful look for years.
Creative Customization for Living Room Style
The beauty of custom furniture lies in its ability to transform a standard design into a perfect fit for your unique space. This approach allows for personal expression while maintaining structural integrity.

Standard height begins at 14 inches, but adjustments to 16 or 18 inches are simple. Modify your support frame and vertical elements accordingly. This flexibility ensures your centerpiece complements existing seating.
Adapting the Design to Your Space
Consider creating matching accent pieces using smaller 24 to 28-inch rounds. This technique develops a cohesive collection throughout your home. The identical construction method maintains visual harmony.
Select the appropriate diameter based on your sofa size. Large sectionals pair well with 40-inch surfaces. For standard three-seaters, 28 inches represents the minimum functional size.
The construction principle extends beyond circular forms. Rectangular configurations become possible using wood slats instead of round elements. This opens possibilities for different room layouts.
Finishing choices offer additional creative opportunities. Some crafters achieve two-tone effects by staining only the vertical base. Most prefer the cohesive look of matching tones throughout the entire piece.
Thoughtful styling enhances the finished product. Rectangular trays provide geometric contrast to round surfaces. Simple arrangements with stone bowls and stacked books create visual interest without clutter.
Cost Efficiency and Budget Planning
Cost analysis demonstrates significant savings when opting for custom-built home furnishings. The financial benefits extend beyond mere material expenses to include personal satisfaction and skill development.

Saving Money with DIY Versus Store-Bought Options
Material expenses for this furniture project average approximately $300. This represents substantial savings compared to designer retail options costing around $2,700.
The time commitment involves about 10 hours of active work. Many crafters spread this across two days to accommodate drying periods.
Cost variations depend on material choices. Pre-cut rounds versus plywood sheets and dowel quantity affect the final budget. Finishing product selection also influences total expenses.
| Cost Factor | DIY Approach | Retail Option | Savings Advantage |
|---|---|---|---|
| Material Costs | $300 average | Included in $2,700 | Immediate 89% savings |
| Time Investment | 10 hours active work | No time required | Skill development value |
| Customization | Full personalization | Standard design only | Unique piece creation |
| Total Value | $800 (with labor) | $2,700 retail | 70% overall savings |
Even accounting for personal time valuation, the economic advantage remains compelling. The satisfaction of handmade creation adds intangible value beyond pure financial metrics.
Troubleshooting and Pro Tips
Many furniture projects face common obstacles that have proven solutions from experienced builders. Anticipating these challenges helps achieve professional results without frustration.

Ensuring Levelness and Secure Joints
An unlevel finished piece is a frequent issue. Use a long level to check from all sides before final attachment of the top round. Build support frames on perfectly flat surfaces to ensure square corners.
Position support frames approximately one-third of the way in from the perimeter for optimal weight distribution. Use adequate screws—two per joint—for maximum stability. This prevents wobbly structures.
Common Pitfalls and How to Overcome Them
The final dowel often requires slight sanding for proper fit. If pieces are too long, they’ll bend; if too short, they’ll fall out. Cut dowels individually or in small batches of 3-4 for accuracy.
Immediately wipe excess glue from edges before it dries. Dried glue won’t accept stain and creates light spots. Use a pin nailer instead of brad nailer to minimize holes requiring filler.
Apply extra adhesive to the hidden inside bottom area where dowels meet the base for additional security. Allow stain application to dry completely overnight before applying sealer coats.
Maintenance and Care Guidelines
Caring for your newly constructed centerpiece requires understanding proper preservation techniques. Consistent attention ensures the furniture remains a beautiful focal point in your living space for years.
Long-Term Upkeep for Your Coffee Table
Protect the surface from heat damage by using coasters and trivets. Direct contact with hot items can create permanent marks on the finish.
Clean the protective coating with a soft, damp cloth during regular dusting. Avoid harsh chemicals that might dull the sealer over time.
Position the furniture away from direct sunlight exposure. This prevents uneven fading, especially noticeable on the top surface compared to shaded areas.
Maintain stable humidity levels in your living area. Extreme fluctuations can affect wood expansion and contraction patterns.
| Maintenance Task | Frequency | Recommended Products | Purpose |
|---|---|---|---|
| Surface Cleaning | Weekly | Soft cloth, mild soap | Remove dust and spills |
| Finish Inspection | Monthly | Visual check only | Monitor protective coating |
| Joint Examination | Quarterly | Screwdriver for tightening | Ensure structural stability |
| Polish Application | Annually | Wood-safe polish | Enhance stain depth |
Proper care transforms furniture from a simple object into a lasting legacy.
Periodically check dowel attachments and base joints during the first few months. This ensures all adhesive bonds have fully cured properly.
With consistent maintenance, your handcrafted piece develops a natural character while maintaining its original appeal. This approach preserves both function and beauty in your home environment.
Conclusion
Completing this furniture project marks a significant achievement in home craftsmanship. You now possess comprehensive knowledge to construct a beautiful centerpiece from start to finish.
Your creation represents substantial savings and a meaningful personal accomplishment. This unique piece adds sophisticated texture to your living area.
The skills learned here—precision work and finishing techniques—are valuable for future endeavors. Your handcrafted item will naturally become a conversation starter.
Remember the flexibility to adapt the core design for matching accent pieces. Your new table anchors the room with a sturdy, elegant presence for years of enjoyment.