
Believe it or not, the average American spends over three hours daily in their living room. Imagine transforming that central space with a piece that combines entertainment and function in a way you’ve never seen.
This guide unlocks the secrets to building your own interactive centerpiece. You will merge the thrill of classic games with practical home decor. The result is a unique conversation starter that serves a dual purpose.
We will walk you through the entire process. You’ll learn how to select the right materials and integrate modern technology like Raspberry Pi. This creates a fully functional system housed within a stylish piece of furniture.
The final product is more than just a table. It’s a social hub for friendly competition, reminiscent of classic arcade cabinets. This project blends creativity with technical skill for a truly rewarding experience.
Key Takeaways
- Create a multi-functional centerpiece for your living area that combines entertainment and furniture.
- Follow a complete guide covering planning, material selection, assembly, and software setup.
- Integrate woodworking skills with modern technology like Raspberry Pi and emulation software.
- Build a social gaming experience ideal for two players facing each other.
- Achieve a successful build from start to finish with comprehensive, step-by-step instructions.
- Design a unique piece that adds personality and nostalgic fun to your home environment.
Introduction to Your DIY Coffee Table Arcade Project
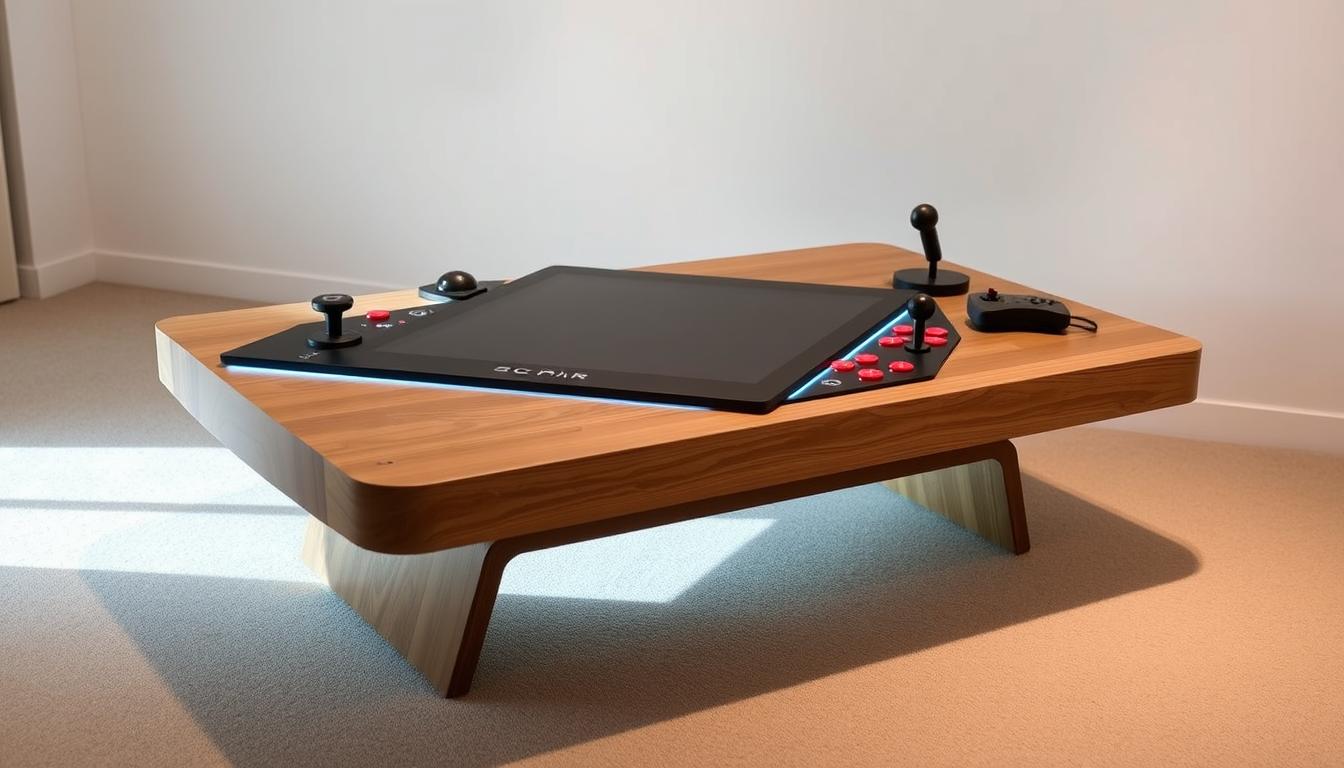
Imagine sitting across from a friend, controllers in hand, ready for competitive play on a functional piece of furniture that doubles as entertainment. This cocktail-style design has been popular since the golden age of arcades in the 1980s.
Unlike traditional upright cabinets, this approach positions players opposite each other. You get face-to-face gaming that creates a unique social experience. The design turns your living space into an interactive hub.
This project combines practical furniture with nostalgic gaming functionality. You’ll need to make key decisions early about your approach. Choosing between Raspberry Pi or PC-based emulation affects your entire build.
Material selection is another crucial consideration for your budget and skill level. While this undertaking requires patience, it’s achievable with moderate woodworking experience. The right tools make the process smoother.
Setting realistic expectations about time commitment and skill requirements is essential. The final result is a rewarding centerpiece that serves multiple purposes. This unique creation becomes more than just a table—it’s a conversation starter that brings people together through classic games.
Project Planning and Materials Overview
Before making your first cut, thorough preparation ensures a smooth building process. You’ll begin by creating detailed plans with precise measurements. Sketch out your table’s dimensions and component placement carefully.

Material selection is your next critical step. You’ll choose between MDF and plywood for your construction. MDF provides easier finishing for painted surfaces, while plywood offers lighter weight.
Your project requires three thicknesses: 1/2″, 3/4″, and 1″ sheet goods. Consider laminating two thinner sheets instead of buying expensive 1″ material. This cost-saving technique works well for structural components.
Plan your cuts from a single 4’x8′ sheet to minimize waste. This strategic approach helps avoid purchasing additional materials. Budget considerations range from $200 to $680 depending on component sourcing.
Make sure to label all parts as you cut them. This simple practice makes subsequent assembly faster and less confusing. Proper organization from the start pays dividends throughout your build.
Essential Tools and Components for Construction
Your toolkit selection directly impacts the precision and durability of your final creation. Having the proper implements transforms complex assembly into manageable steps. This foundation ensures professional results from start to finish.
Recommended Tools for Precision Work
Quality clamps are indispensable for holding parts securely during assembly. You’ll need various types including Quick Grips and bar clamps. A reliable drill with assorted bit sizes handles everything from pilot holes to larger openings.
Precision measuring tools like levels and carpenter squares guarantee accurate cuts. For shaping curves, a jigsaw with Bosch blades delivers clean results. A Kreg Jig creates strong, hidden joints that elevate amateur work to furniture quality.
| Tool | Primary Purpose | Recommended Brand | Alternative Option |
|---|---|---|---|
| Clamps | Secure assembly | Various | Hand pressure (limited) |
| Power Drill | Hole creation | DeWalt | Hand drill |
| Jigsaw | Curved cuts | Bosch blades | Coping saw |
| Kreg Jig | Joinery | Kreg | Traditional brackets |
Material Sourcing and Budget Considerations
Local hardware stores often offer better deals on small monitors than online retailers. For specialty materials like T-molding, dedicated online suppliers provide the best selection. Buying quality wood and proper screws upfront prevents costly rework later.
You’ll need to invest a lot of thought into sourcing strategy. Make sure to compare prices for electronic parts across multiple vendors. This approach maximizes your budget while ensuring component compatibility.
Choosing the Perfect Coffee Table and Wood Material
The foundation of your project starts with selecting the right base structure. You have two primary paths: modifying a pre-existing unit or building a custom case from raw materials.
For a quicker start, IKEA’s BOKSEL or BESTA units offer affordable options under $100. These provide a ready-made cabinet structure with built-in storage. Ensure your chosen model has adequate internal space for electronics and comfortable playing height.
Your choice of core material significantly impacts the build’s weight and final look. Medium-density fiberboard (MDF) is compressed sawdust that sands to a perfectly smooth finish. This makes it ideal for painted surfaces, though cutting creates significant dust.

Plywood is a lighter alternative, making the finished piece easier to move. It generates less dust during work but requires more preparation to hide the wood grain if you plan to paint. For a natural look, cabinet-grade maple plywood with two good sides is a smart investment.
Consider your priorities for portability versus finish quality. This decision is the best way to ensure your creation is both functional and visually appealing. Planning storage for cables and accessories within the design adds great utility.
Crafting the Arcade Cabinet Base
The cabinet base serves as the backbone of your entire project, requiring careful assembly techniques. This foundational structure supports all electronic components and withstands regular use.
You’ll begin by cutting your sheet goods to manageable sizes using precision tools. A circular saw with guide rail ensures straight, accurate cuts for each component.
The cleat assembly method revolutionizes traditional cabinet construction. Small wood strips attached to panel edges create self-aligning joints. This technique eliminates measurement errors during the assembly process.
Cut spacer blocks to ensure perfect cleat positioning. For example, if a side panel insets by 1/2″, cut a 1.25″ spacer. This accounts for material thickness plus the desired inset distance.
Secure joints using wood glue combined with brad nails. The nails act as temporary clamps while adhesive cures. If you lack a nailer, use standard clamps instead.
| Assembly Method | Strength Rating | Difficulty Level | Tool Requirements |
|---|---|---|---|
| Cleat System | High | Medium | Basic woodworking |
| Pocket Screws | Medium-High | Low | Kreg jig required |
| Butt Joints | Medium | Low | Clamps only |
| Dowel Construction | High | High | Precision drill press |
Allow glue to cure for 30-45 minutes between assembly steps. This ensures strong, permanent bonds that withstand years of use.
Verify squareness using a carpenter’s square at each stage. Check diagonal measurements to confirm perfect alignment. The bottom panel must sit flush with all side components.
Your completed cabinet provides proper spacing for control panels and internal electronics. This careful construction sets the stage for subsequent installation steps.
Building Control Panels and Joystick Box
The most interactive part of your build begins with crafting the player interfaces. This step determines how responsive your controls feel during gameplay. You’ll create mirror-image panel assemblies for opposite sides of your table.
Precision Cutting and Template Use
Spray-and-stick templates revolutionize component marking. Cut out your template pattern and apply it with spray adhesive to your material. This method eliminates measurement errors for perfect symmetry.
Stack multiple part pieces using double-sided tape. Cut them simultaneously with a bandsaw for identical panel profiles. This technique ensures your joystick boxes match perfectly.

Assembling the Control Hardware
Drilling templates speed up hole creation significantly. Use a center punch to create starter divots at each mark. This prevents drill bit wandering for perfect alignment.
Forstner bits produce cleaner holes than standard paddle bits. Both can achieve acceptable results with careful technique. The front surface appearance depends on clean bore holes.
Special considerations apply when working with thin MDF. Avoid brad nails as they cause splitting. Use only glue and clamps with 30-minute cure times between each step.
Frame the interior with trim pieces that hide fasteners. These provide mounting points for your joystick mechanisms. The internal structure supports years of vigorous joystick operation.
Integrating Retro Gaming Elements into Your Design
The soul of your interactive centerpiece lies in its authentic visual details. These elements transform a basic piece into a genuine entertainment hub. Proper styling captures the essence of classic gaming eras.
Color selection creates immediate visual impact. Bright yellow T-molding applied to edges provides that signature arcade cabinet look. This trim serves both protective and aesthetic purposes along your surfaces.
Control panel layout affects gameplay authenticity significantly. Tested configurations recreate the feel of original machines. Proper spacing between buttons and joysticks ensures comfortable play sessions.
As one expert noted,
The best recreations balance historical accuracy with modern ergonomics.
Your two-player setup requires thoughtful screen orientation planning. The viewing angles must work equally well for both participants. This consideration is crucial for the cocktail-style experience.
| Finish Option | Authenticity Level | Difficulty | Maintenance |
|---|---|---|---|
| Painted with vinyl graphics | High | Medium | Easy cleaning |
| Natural wood stain | Moderate | Low | Regular polishing |
| Laminated artwork | Very High | High | Durable surface |
| Mixed media approach | Customizable | Variable | Depends on materials |
Competition-grade components provide the tactile feedback that defines classic gameplay. These parts withstand vigorous use while delivering authentic responses. The right choices make your creation feel genuine.
Balance nostalgic aesthetics with contemporary technology integration. Your piece should look period-appropriate while housing modern systems. This harmony creates the ultimate multifunctional centerpiece.
DIY Coffee Table Arcade: Retro Gaming Meets Furniture Design – A Comprehensive Guide
Your journey to a functional entertainment centerpiece begins with understanding the complete workflow. This overview connects every phase from initial sketches to the final power-on test.
You will see how furniture design principles blend with arcade construction. This merger creates a piece that excels in both form and function. The result is a sturdy cabinet that also delivers an authentic gaming experience.

Setting realistic expectations is a crucial first step. Building the physical structure often takes several weekends. Software setup and testing require a similar amount of dedication.
This project presents unique challenges compared to standard upright arcade builds. The dual-sided control panels and horizontal screen orientation need careful planning. This is the best way to ensure a great experience for both players.
You will invest a lot of effort, but the satisfaction is immense. This guide prepares you for the entire process. You will create a unique table that becomes the heart of your living space.
Customizing Monitor Integration and Screen Setup
Accurate screen placement transforms your build from functional to professional-grade. This phase determines how well players can view the action from typical seating positions.
You must choose between two primary mounting methods. Each approach offers distinct advantages for different build styles.
Measuring and Cutting for the Perfect Fit
Precision cutting ensures the viewable area remains completely unobstructed. Measure your monitor‘s active display region carefully before marking the table top.
Create an opening that matches the screen dimensions exactly. This prevents the table edge from covering gameplay elements.
For embedded screens, route a recess around the hole edge. This technique lowers the display to just 1/4″ below the surface. Standard 3/4″ material would block the bottom view.
Use a router bit to create clean, precise edges. This step requires careful attention to depth settings.
| Mounting Method | Best For | Cost Range | Installation Difficulty |
|---|---|---|---|
| Articulating VESA Arms | IKEA-based builds | $17-40 | Medium |
| Fixed Embedded Mounting | Custom cabinet builds | $50-100 | High |
| Portable Screen Integration | Quick modifications | $80-150 | Low |
Select 15-19″ displays with 4:3 aspect ratios for authentic retro gaming. These proportions match original arcade cabinets perfectly.
Remember to cut access notches for power buttons and controls. These small details make daily use much more convenient.
Installing Controls, Buttons, and Wiring
Wiring and control assembly represents the nervous system of your entertainment center. This phase connects physical components to electronic systems for seamless operation.
Proper installation ensures responsive gameplay and long-term reliability. You will work with arcade controller kits containing all necessary parts.
Securing Joysticks and Button Assemblies
Begin by mounting your joystick to the control panel using four mounting screws. Tighten them securely without overtightening to prevent wood damage.
Arcade buttons slide through pre-drilled holes and secure with plastic retaining nuts. Test hole sizes on scrap wood first to ensure perfect fits.
The joystick must move freely without hitting hole edges. This is crucial with 3/4″ material thickness.

Efficient Wiring Techniques and Cable Routing
Place the encoder between buttons and joystick for hidden accessibility. Each button receives individual signal wires for precise control.
Use shared wires for LED power connections to simplify your setup. This approach reduces cable clutter significantly.
Route USB cables to your Raspberry Pi while maintaining future maintenance access. Power cables connect directly to your internal strip.
| Component Type | Connection Method | Wire Count | Installation Time |
|---|---|---|---|
| Joystick | 4 mounting screws | 5 wires | 10 minutes |
| Action Buttons | Plastic retaining nuts | 2 wires each | 5 minutes each |
| Encoder Board | Hidden placement | USB cable | 15 minutes |
| LED Lighting | Shared power line | 1 common wire | 10 minutes total |
Organize cables using brackets and management techniques. This prevents tangled messes inside your cabinet. Your finished control system will provide years of reliable service.
Finishing Touches: T-Molding, Paint, and Polyurethane Finishes
Applying the right finishes at the correct sequence elevates your build from amateur project to authentic recreation. Proper timing prevents common mistakes that compromise your final appearance.
Route T-molding slots before final assembly when router access remains available. This critical step ensures clean grooves along all edges of your cabinet. Waiting until after glue-up makes this impossible.
Start surface preparation with filler primer that sands to glass-smooth perfection. This product fills wood imperfections and minor construction flaws effectively. You achieve professional-ready surfaces for painting.
Use proper rattle can technique for surprisingly good results. Flat black paint from hardware stores hides imperfections well. Your finish choice matters less if applying vinyl graphics later.
| Finish Type | Best Application | Preparation Time | Skill Level |
|---|---|---|---|
| Filler Primer + Paint | Painted surfaces | 2-3 hours | Beginner |
| T-Molding Only | Natural wood look | 1 hour | Intermediate |
| Oil-Based Polyurethane | Durable clear coat | Multi-day process | Advanced |
| Vinyl Graphics Over Base | Authentic arcade look | 30 minutes | Intermediate |
For polyurethane finishes, choose oil-based Minwax semi-gloss applied with natural hair brushes. Work in well-ventilated areas due to strong fumes. Use bright lighting to inspect for drips after each coat.
Apply T-molding to cabinet sides, control panel faces, and around the table top. You may need three different sizes unless building with uniform material thickness. Take time to ensure proper alignment for clean lines.
Setting Up Your Raspberry Pi and RetroPie Emulator
The digital heart of your entertainment center comes to life through careful software configuration. This step transforms hardware into a fully functional gaming system. You’ll work with the Raspberry Pi microcomputer and RetroPie operating system.

Flashing the SD Card with RetroPie
Begin by preparing your MicroSD card for the RetroPie installation. Format the card using SDCardFormatter on your computer. Then use Win32DiskImager to copy the RetroPie image file onto the storage device.
This process creates a bootable system on your card. After imaging, the card may show reduced capacity initially. This is normal and will expand during the first boot sequence.
Configuring EmulationStation for Gameplay
Connect your Raspberry Pi to power using the micro-usb cable. The system will guide you through initial setup screens. You’ll need to configure controller mapping for your arcade controls.
Use the command line to map buttons to emulator functions. Type specific commands to ensure proper controller recognition. This step is crucial for responsive game play.
Configure network settings for WiFi connectivity. This enables file transfers from your computer to the Pi. Use SFTP applications to copy game ROMs to the appropriate directories.
Your setup is complete when you can navigate the EmulationStation interface. The operating system will recognize your controls and display available games. Test each button to confirm proper mapping before final assembly.
Effective Cable Management and Interior Organization
Strategic cable management ensures both safety and accessibility within your cabinet. A clean interior space prevents hazards and makes future upgrades straightforward.
Mount your power strip on the left side wall alongside the Raspberry Pi. This placement keeps cables away from moving components like drawers. It creates an organized electronics hub.
Clutter-Free Wiring Strategies
Cut 2-inch access ports on both cabinet sides using a jigsaw. These slots allow wire passage between compartments. They also provide clamping points during control panel assembly.
Use Cable Drops to secure stray cables in drawers and on cabinet backs. Install wire brackets on interior walls for clean cable runs. This approach minimizes mess and prevents tangles.
A well-organized interior is the mark of a professional build, where every wire has its place.
For charging functionality, route three 6-foot cables through drawer backs. Bloobury 3-in-1 cables offer universal connectivity. The BESTEK charging station provides ample power outlets for under $20.
| Management Method | Primary Benefit | Installation Difficulty | Cost Range |
|---|---|---|---|
| Cable Drops | Prevents wire movement | Low | $5-15 |
| Wire Brackets | Guides cable paths | Medium | $8-20 |
| Access Ports | Compartment connection | High | Free (cutting) |
| Charging Integration | Guest convenience | Medium | $15-40 |
Your systematic approach creates a maintenance-friendly environment. The interior space remains accessible for upgrades. This planning saves a lot of frustration later.
Troubleshooting Issues and Ensuring Safety During Construction
Anticipating potential problems before they occur saves time and materials during construction. Common issues like plywood tear-out can ruin visible surfaces. You can minimize this by using brand new blades designed for plywood and cutting slowly.
For table saws, keep the good side facing up. With jigsaws, position the good side down based on blade cutting direction. This simple step prevents surface damage that requires starting over.
Always test drill holes in scrap wood before working on actual components. This ensures perfect fits for buttons and hardware. When cutting material, verify your layout maximizes sheet usage to avoid purchasing additional sheets.
Label all parts immediately after cutting to prevent confusion during assembly. With 1/2″ MDF, avoid brad nails as they cause cracking and splitting. Use glue-only assembly with 30-minute wait times between steps.
Make sure to route notches for monitor power buttons during installation. This prevents having to uninstall screens just to power them on after surges. Take time to secure workpieces properly before using power tools.
Don’t compromise on tool quality—inadequate equipment leads to disappointing results and wasted materials. Each construction phase deserves careful verification to catch errors early when they’re easiest to fix.
Enhancing Functionality with Creative Additions
The true versatility of your creation emerges when you explore its potential beyond gaming. Your centerpiece offers unused interior space that can serve multiple purposes. This transforms it from a single-use item into a truly multifunctional piece.
Adding Charging Ports and Storage Solutions
Integrate universal charging capabilities using strategically placed usb hubs. The BESTEK charging station provides four ports that handle phones and tablets efficiently. Mount these inside drawers for convenient guest access.
Drawer storage keeps controllers and cables organized without cluttering your living space. Route cables behind shelves to maintain clean lines. Upper shelves become display areas for collectibles or additional electronics.
Consider adding an always-ready guest computer in the extra cabinet space. Old laptops or Chromebooks fit perfectly and remain charged for visitor use. This turns your table into a true entertainment hub.
Follow these simple steps to maximize your table‘s utility. Create a template for mounting components to ensure proper placement. The top surface remains clear for traditional use while hidden compartments expand functionality.
Conclusion
Your completed table now stands as a testament to your craftsmanship and vision. This unique centerpiece brings classic entertainment directly into your living space.
Secure the protective glass using specialized U-shaped clips at each corner. This final step protects your screen while maintaining easy access for maintenance. Clean the surface thoroughly before permanent installation.
Make sure to test every game and control before celebrating your achievement. Your thoughtful setup allows comfortable couch play instead of awkward hunching. This design advantage makes your arcade truly practical for daily use.
This project transforms your home in a meaningful way. Share your build with the maker community to inspire others. Your creation serves as both functional furniture and an entertainment hub for years to come.