
Did you know that some designer furniture pieces, like a certain fluted model, can cost over $2,700? That’s a significant investment for one item in your home.
However, you can achieve a similar look of high-end style without the luxury price tag. Creating your own furniture is an incredibly rewarding and accessible endeavor.
This guide is designed to empower you to craft a beautiful, custom piece for your space. You gain complete control over the materials, dimensions, and final finish.
Whether you are new to woodworking or have some experience, this project is structured for success. You can choose from various designs to match your skill level and aesthetic taste.
In just about 10 hours and for roughly $300 in materials, you can build a functional work of art. The result will be a unique centerpiece that reflects your personal style.
Key Takeaways
- You can save thousands of dollars by building furniture yourself instead of buying designer brands.
- This project is designed to be approachable for various skill levels, from beginners to experienced crafters.
- You have full control over the final product’s size, materials, and appearance.
- The entire process typically takes around 10 hours to complete.
- The material cost is approximately $300, offering significant savings.
- You will learn professional techniques for construction and finishing.
- The finished piece will be a unique, high-quality addition to your home.
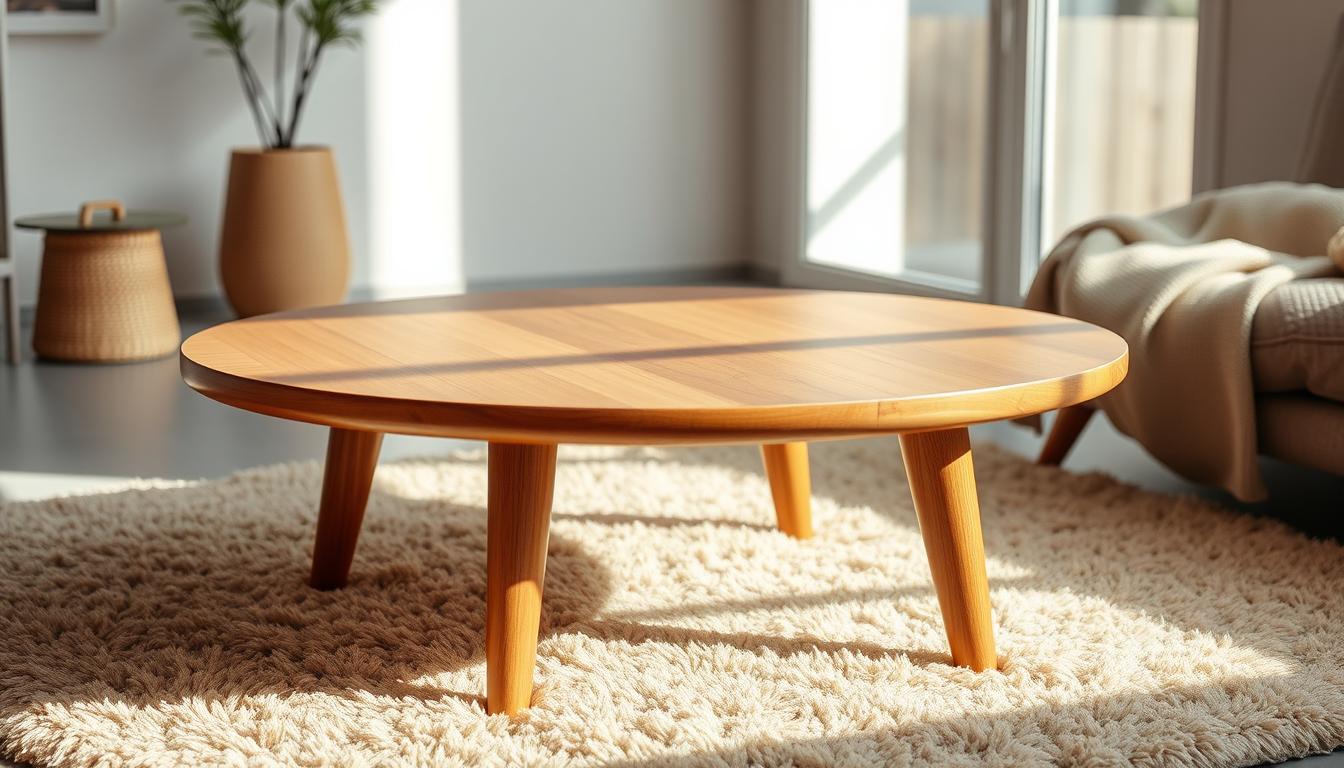
Introduction: The Appeal of a DIY Round Coffee Table
Curved furniture designs offer unique benefits that rectangular pieces simply cannot match. This approach to furnishing your space combines practical advantages with aesthetic appeal.
Why a Round Coffee Table Enhances Your Living Space
The circular shape significantly improves movement patterns throughout your seating area. You’ll notice easier navigation, especially with sectional arrangements where people move around frequently.
Safety becomes a major advantage with curved edges. Households with children or elderly family members benefit from the absence of sharp corners that could cause injuries.
| Feature | Round Design | Rectangular Design |
|---|---|---|
| Traffic Flow | Excellent – no corner obstacles | Moderate – corners interrupt movement |
| Safety Level | High – curved edges | Lower – sharp corners |
| Visual Impact | Breaks monotony of straight lines | Matches existing rectangular furniture |
| Accessibility | Equal access from all sides | Limited access from corners |

From a design perspective, most living area furnishings feature straight lines and right angles. A curved centerpiece introduces visual interest and creates harmony by contrasting with surrounding pieces.
The Benefits of Building Your Own Furniture
Creating your own furnishing provides tremendous financial savings. While retail options can cost thousands, your material investment remains around $300 for a comparable quality piece.
Customization represents another significant advantage. You control every aspect including dimensions, wood selection, and finish colors to match your existing decor perfectly.
This project helps develop valuable woodworking skills that serve you in future home improvements. The satisfaction of creating a functional centerpiece with your own hands offers rewards that store-bought items cannot match.
Gathering Your Materials and Tools
Sourcing the correct wood, hardware, and safety gear transforms a complex project into an achievable endeavor. Having everything organized before you begin prevents frustrating mid-project delays.

Essential Wood, Dowels, and Hardware
For the fluted design, you need two 36-inch round boards for the top and bottom surfaces. These are available pre-cut or you can create them from a 4×4 foot plywood project panel.
Approximately 42 half-inch round dowel pieces create the distinctive vertical appearance. Your hardware selection should include Titebond wood glue and various screws in different lengths.
Specialized components like Figure 8 fasteners ensure secure attachment of the table top. A 5/8-inch Forstner drill bit creates clean countersink holes for professional results.
Recommended Tools and Safety Gear
Essential power tools include a miter saw for precise cuts and a power drill for assembly. A long level helps maintain straight alignment during construction.
If cutting your own circular top, a jigsaw works perfectly. Always wear eye protection and hearing protection when operating power equipment.
Dust masks protect your respiratory system during sanding operations. These safety measures ensure you can work comfortably and confidently throughout the entire process.
Step-By-Step: DIY Coffee Table Round: A Simple Circular Build
Setting up your workspace correctly is the first critical step toward creating a professional-looking piece. This systematic approach ensures each phase progresses smoothly from start to finish.
Preparing Your Workspace and Measuring Accurately
Begin by clearing a flat, level surface for assembly. This foundation prevents wobbling and ensures square frames. Use a long level to verify your work area.
Accurate measuring is absolutely essential for success. Rest your straight-edged ruler against a square when marking cut lines. This technique guarantees precision on dowels and lumber.
| Preparation Strategy | Benefit | Time Investment |
|---|---|---|
| Research similar projects | Avoid common mistakes | 30-60 minutes |
| Organize tools and materials | Maintain workflow efficiency | 15-20 minutes |
| Verify level surface | Ensure structural integrity | 5-10 minutes |
| Batch-process identical cuts | Save time and ensure consistency | Varies by task |

Tips for a Smooth Build Process
Plan for approximately 10 hours of total work time spread across sessions. This allows for glue drying periods and careful attention to detail.
Wood glue typically takes 20 minutes to begin setting. This gives you adequate working time to adjust positioning before joints become permanent. Don’t rush this critical step.
Batch-processing similar tasks saves significant time. Cutting multiple dowels at once maintains consistency across identical pieces. Keep your workspace organized with all tools within easy reach.
Constructing the Table Base and Frame
Creating a stable framework is essential for both safety and functionality in furniture design. This phase establishes the structural foundation that supports the entire piece.

Building the Inner Support Structure
Begin by cutting your lumber to create the internal skeleton. You’ll need four 11-inch pieces and four 12-inch pieces from 2×4 boards. These dimensions establish the 14-inch finished height for a contemporary appearance.
Assemble these frame pieces into two rectangular frames using 2.5-inch wood screws. Use two screws at each joint for maximum stability. This internal framework connects the top and bottom surfaces securely.
For the square base option, cut four legs at 14 inches, two main stretchers at 25 inches, and four side stretchers at 10.75 inches. Attach stretchers flush with both top and bottom of the legs.
| Design Option | Leg Configuration | Stability | Assembly Time |
|---|---|---|---|
| Square Base | 4 straight legs | Excellent | 45 minutes |
| Slanted Leg | 4 angled legs | Very Good | 60 minutes |
Center the side sections precisely with 1.25 inches of space on each side. This ensures balanced weight distribution and symmetry.
For the slanted leg design, cut both ends of each leg at matching 15-degree angles. Each leg should measure 14.5 inches long. This creates a modern look while maintaining stability.
Always work on a perfectly level surface during assembly. Any inconsistencies will transfer to your frame and affect the final product’s stability.
Precision Cutting and Assembly Techniques
Achieving professional results requires meticulous attention to detail during the assembly phase. This stage transforms individual components into a cohesive, sturdy furniture piece.

Measuring, Cutting, and Fitting Dowels Accurately
For the fluted design, cut your wooden dowels to exactly 12 inches. Use a straight-edged ruler against a square to ensure perfect measurements.
Cut several dowels at once for consistency. Each piece should fit snugly between the top and bottom surfaces without any wiggle room.
Apply wood glue sparingly to both ends of each dowel. The 20-minute setting time allows for positioning adjustments. Immediately wipe away excess glue to prevent stain absorption issues.
Securing the Frame with Glue and Screws
Use a Forstner bit to create countersink holes in your frame pieces. These holes allow Figure 8 fasteners to sit flush against the surface.
Mark frame positions on your round board before drilling. This ensures symmetric placement for proper balance.
Attach the bottom frame with half-inch screws. Rest the top circle on the frame and check levelness from all sides before permanent attachment.
When using a Kreg jig, remember to switch screws: 2.5-inch for frame assembly, 1.25-inch for attaching the top.
Finishing, Staining, and Final Touches
Proper surface preparation separates amateur results from professional-quality outcomes. This final phase brings out the natural beauty of your materials and protects your investment.

Preparing the Wood Surface with Sandpaper and Conditioner
Begin with a progressive sanding approach for your project surface. Start with rough grit paper, move to medium, then finish with fine 220-grit sandpaper. This three-stage process creates the silky-smooth foundation needed for even stain absorption.
Wipe away any dried glue spots before sanding, as they resist stain. For plywood surfaces, remember that exposed edges absorb stain differently than the face veneer. Apply wood conditioner to all surfaces before staining to prevent blotchy results.
Applying Stain, Polycrylic, and Edge Treatments
Choose your finish style based on decor preferences. Rustic stains highlight natural grain, while crisp white paint creates modern appeal. Two-tone combinations add visual interest to your piece.
If working with plywood, apply 3/4-inch iron-on edge banding before finishing. This thin wood strip matches the face veneer and accepts stain uniformly. For spray applications, work in a well-ventilated area around 60 degrees Fahrenheit.
Apply one coat of sanding sealer followed by three protective topcoats. Water-based polyurethane products offer low-odor application with excellent durability. Detailed techniques are available through supplementary video tutorials.
Safety and Efficiency Tips for a Successful Build
Prioritizing safety and efficiency transforms your woodworking experience from stressful to satisfying. Following proven practices protects your well-being while accelerating your progress toward a beautiful finished piece.
Using Tools Safely and Maintaining Your Equipment
Always wear protective gear including safety glasses, hearing protection, and dust masks. These items guard against common workshop hazards.
Keep your cutting tools sharp and well-maintained. Dull blades require excessive force and can cause dangerous kickback. When using routers with large bits, maintain a firm two-handed grip.
Consider wood characteristics before purchasing materials. Some species like hickory are extremely hard to sand, potentially adding hours to your project.
Time-Saving Strategies and Best Practices
Read through all instructions completely before beginning. Understanding the full process helps you anticipate challenges.
Follow the cardinal rule: measure twice, cut once. This prevents wasting expensive materials and saves correction time.
Batch-process repetitive tasks like cutting multiple dowels. This improves accuracy through consistent setup.
Apply wood glue at every joint for strength, but immediately wipe away excess. Dried glue creates stain-resistant spots.
Pre-drill and countersink all screw holes to prevent splitting. Use 1.25-inch screws unless otherwise indicated.
Reference supplemental video tutorials for visual demonstrations. Ana White offers excellent guidance on techniques like cutting perfect circles.
Water-based finishing products offer significant safety advantages. They produce minimal fumes and pose no fire hazard.
Allocate approximately 10 hours for complete execution. Don’t rush steps—quality results from careful attention.
Conclusion
Completing this furniture project marks a significant achievement in home craftsmanship. You have created a beautiful centerpiece for your living area for approximately $300, a fraction of the $2,700 cost for a comparable designer piece.
This endeavor is more than just assembling a coffee table; it’s an investment in lifelong skills. The finished table will be a cherished part of daily life and special family moments.
The unique circle shape offers excellent flow and safety. If you desire further guidance, detailed printable plans are available in an accessible format.
Free plans from resources like Shanty2Chic offer alternative designs. For those who prefer not to craft it themselves, similar tables can be purchased.
The pride of creating a functional work of art from boards or plywood is immense. This success prepares you for future projects, empowering you to continue transforming your space.