
Surprising fact: a 48″ x 24″ x 2″ slab can weigh 100–130 lbs, so planning for mobility is vital before you begin.
You will transform a basic frame into a modern centerpiece that balances raw materials with refined finish.
Start small: mix a lightweight feather concrete in a disposable paint tray, add water slowly, and stir until it feels like cake batter. Let the mix rest for ten minutes before spreading thin layers. Sand the existing top first, apply several thin coats, then smooth with a plastic scraper.
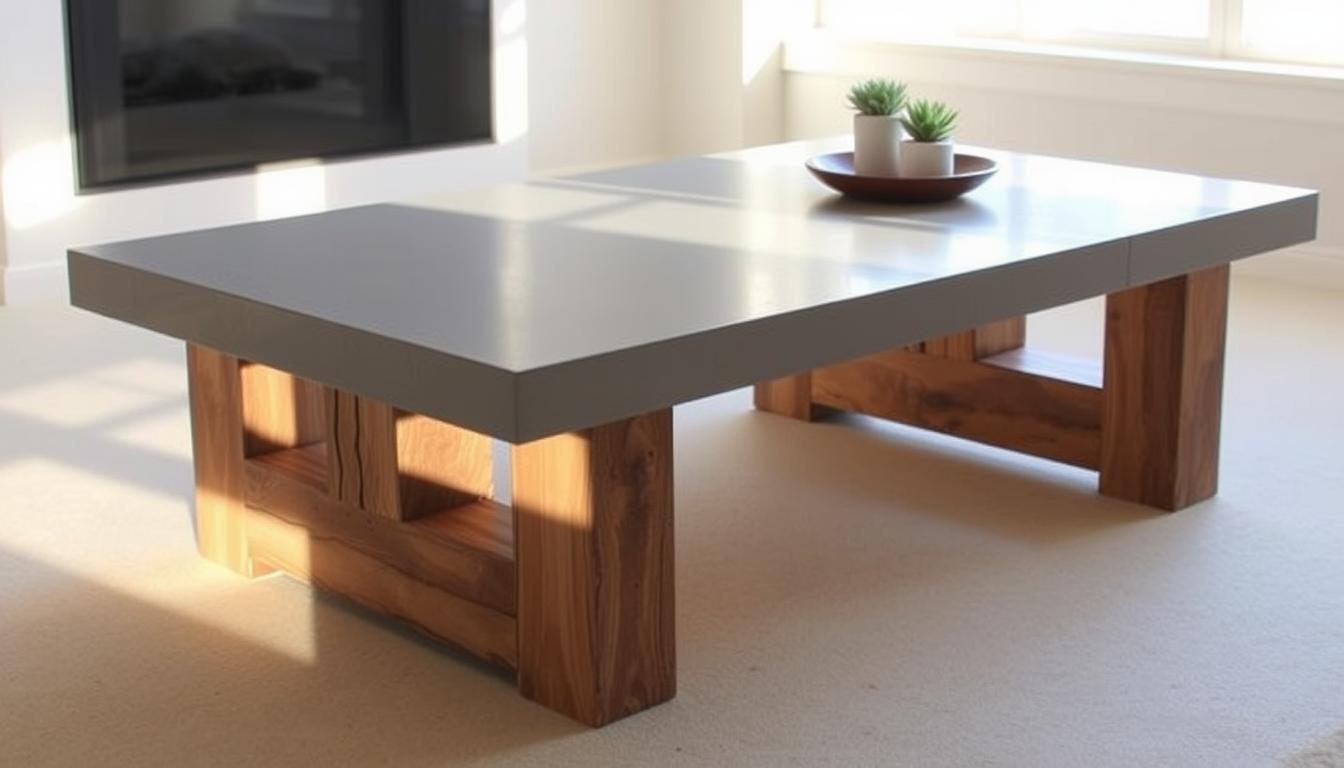
Bolted steel legs with cross supports give rigidity without welding. Aim for an ADA-friendly height of 16–18 inches so the piece fits your living spaces. Finish the wood with a dark walnut stain, then seal the top with about three thin coats for a durable, low-sheen surface.
Key Takeaways
- Plan for weight and detachable legs to keep the piece movable.
- Use thin concrete layers, rest the mix, and sand between steps for a smooth top.
- Bolt a steel frame with cross supports to avoid welding while keeping strength.
- Strip glossy finish, stain wood dark, and apply wipe-on poly for a refined edge.
- Allow slow curing (48–72 hours) and use low-VOC sealers for better air quality.
Overview: What You’ll Build and Why It Works in Modern Living Rooms
You will make a slab-top surface that anchors your living room visually and functionally. The build offers durability and a unique finish that often rivals $800+ designer examples for a fraction of the price. Use a lightweight concrete mix for a smooth pour and predictable cure.
Plan the size to fit your room. Aim for an ADA-friendly height of 16–18 inches so the table aligns with sofas and chairs. Typical slabs around 48″ x 24″ x 2″ weigh 100–130 lbs, so decide on detachable legs or casters for mobility.
Success starts with clear goals: rectangular vs. round, minimalist vs. organic. Use melamine forms and reinforcement so the top demolds cleanly and stays strong. Follow a slow, covered cure for 48–72 hours, then wait up to a week before heavy use.
- Materials: mix choice, forms, and reinforcement.
- Bases: powder-coated metal, solid wood, or repurposed vintage legs secured with anchors.
- Finish: low-VOC, food-safe sealers applied in thin coats.

| Feature | Benefit | Typical Spec |
|---|---|---|
| Slab size | Visual weight, durability | 48″ x 24″ x 2″ |
| Height | Comfort, ADA-friendly | 16–18 inches |
| Base options | Style flexibility, stability | Powder-coated steel, wood, vintage |
Plan Your Design: Size, Style, and Room Fit
Map the footprint in your living room before choosing final proportions. Measure sofa depth, walkways, and sightlines so the piece feels intentional in the space.
Set height first: aim for ADA-friendly heights of 16–18 inches so the table aligns with seating. Use inches in your sketch to avoid conversion errors when ordering legs or hardware.
Pick a form—rectangular, round, or square—and decide edge details. Crisp edges read modern, while a small chamfer or softened corners protect hands and reduce chips.

Account for weight: a 48″ x 24″ x 2″ slab can weigh 100–130 lbs. Plan detachable legs or cast-in handholds to keep portability practical.
Choose a base strategy that uses bolted metal frames with cross supports. Drill holes with the correct bit (1/8″ pilot where needed), tighten hex nuts, and use brackets for a clean top attachment.
- Model the table footprint in your room to check clearances.
- Mark holes for leg anchors before the pour so alignment is exact after cure.
- Use melamine forms for smooth edges and keep reinforcement at least 1″ from the form edge.
Document measurements and allow time for dry-fit rehearsals. A quick mockup avoids surprises and keeps projects on schedule.
Materials, Tools, and Safety Essentials
Gather the essentials before you start so each step flows without pauses. This reduces mistakes and keeps the build on schedule.

Choices for the pour
Feather mixes work in small batches in a disposable paint tray; add water slowly until the texture reads like cake batter. Traditional bagged mixes aim for thick peanut butter consistency and pour cleanly into a melamine form.
Mold, reinforcement, and edge care
Set reinforcing mesh or rebar with at least 1″ clearance from edges to limit perimeter cracks. Seal form seams and tap the mold with a rubber mallet. Run a palm sander against the sides to coax out trapped air.
Wood and metal components
Use 3/4″ birch plywood for a strong top, then hide ply layers with iron-on veneer edging for a furniture-grade look. Build a bolted steel base from 1″ metal strips, cut with a jigsaw and drilled with a 1/8″ bit. Clean steel in white vinegar before finishing.
Safety and workspace setup
Work in 60–75°F with good ventilation. Wear nitrile gloves and safety goggles, and stage tools—sander, clamps, rubber mallet, scraper—so you always reach what you need. Keep clean water nearby for mixing and rinsing.
- Tip: mark holes before the pour so the tabletop mates to the base without rework.
- Tip: avoid very hot, cold, or rainy days for outdoor pours.
Concrete and Wood Coffee Table: Industrial Chic DIY Tutorial
Begin by dialing in the mix so its texture matches the job at hand. Use a disposable paint tray and add water slowly until a feather product reads like cake batter for skim coats or like thick peanut butter for a full pour. Let the mix rest about 10 minutes to reduce entrained air.
Prep and mix
Measure small batches and stir gently. Resting the mix cuts trapped air and helps avoid air bubbles while you work.
Pouring and leveling
Spread thin layers, smooth with a plastic scraper, and tap the mold with a mallet. Run a palm sander along form sides to chase bubbles and keep edges crisp.

Drying and sanding
Use a fan only to speed surface dry when time is tight. For strength, cover the slab and slow-cure for 48–72 hours, then wait up to a week before heavy use.
Sand lightly to remove nibs. For pinholes, use diamond pads and a slurry patch before final sanding.
Sealing and finishing the wood
Apply two to three thin coats of low-VOC, food-safe sealer, waiting about 24 hours before the first coat after wet work. For the wood, strip glossy finishes, apply a dark walnut stain, then protect with wipe-on poly, sanding between coats.
Frame, hardware, and assembly
Build a bolt-together metal base from 1″ strips. Clean parts in white vinegar, drill holes with a 1/8″ bit, add cross supports, and align brackets for a flush mount.
- Quick steps: prep mix, pour thin layers, chase air, slow cure, sand, seal.
- Dry-fit the top to the frame, then fasten hardware in a crisscross pattern so the piece stays square.
| Item | Spec | Tip |
|---|---|---|
| Cure time | 48–72 hours covered | Wait additional hours for full strength |
| Sealer | 2–3 thin coats | Low-VOC or food-safe |
| Drill bit | 1/8″ | Pilot holes for clean holes |
Curing, Sealing, and Edge Perfection
Give the slab time: a slow, covered cure helps reach full strength. Keep the work in a stable 60–75°F spot for the first 48–72 hours and avoid speed cures. Wait up to one week before heavy use so the piece gains long-term durability and resists stains.

Surface refinement
After demolding, tackle the top with dry diamond hand pads. Move through grits to remove small blemishes without thinning profiles. Use a matching slurry mix to fill deeper pinholes and hairline voids.
Edges and corner care
Correct chips by easing sharp corners slightly. Work with a hand sander near edges to avoid dig-ins that show under grazing light. Vibrate the form with a mallet or palm sander during the pour to reduce trapped air along the perimeter.
Sealing and final finish
Apply a thin first coat of low‑VOC sealer once the slab feels dry to the touch. Follow with a second coat after the recommended dry time to create a uniform, wipeable finish that resists stains.
- Quick tips: keep the slab covered during the critical cure hours.
- Progress sanding gradually; patch only what you need to preserve the profile.
- Catalog mix, form technique, and seal choices so future tables require less rework.
“Slow cures and careful sanding beat rushed fixes every time.”
Style It, Price It, and Keep It Sustainable
You can achieve a high-end look at a fraction of the retail price by choosing materials wisely. A designer concrete coffee table can retail for $800+, yet a bolted steel and plywood build often runs near $156 in materials. That gap lets you invest in better finishes or low‑VOC sealers without blowing the budget.
Budget-smart choices
Compare cost honestly: allocate funds to the tabletop mix and the base so each element reads premium. Consider powder-coated steel legs or a solid wood base for a refined result.
Styling for living spaces
Pair warm wood tones with crisp metal finishes and one controlled pop of color. A subtle stain on nearby furniture will tie the room together and make the tabletop feel like part of the room’s design.

Cleaner indoor air and greener mixes
Choose low‑VOC sealers and recycled‑content mixes to reduce indoor emissions. Clean weekly with pH‑neutral products and plan an annual reseal to keep the finish resilient.
- Embed accents such as brass inlays or river stones during the pour for a permanent signature.
- Light styling—books, a tray, and a plant—keeps the piece functional in daily living.
- Maintenance budget—factor in cleaners and a yearly reseal so the piece ages gracefully.
| Item | Typical cost | Benefit |
|---|---|---|
| Designer retail | $800+ | High finish, ready-made |
| Bolted steel + plywood build | ~$156 | Customizable, cost-effective |
| Low‑VOC sealer | $15–$40 | Better indoor air quality |
“A modest budget with careful choices can produce a gallery-quality piece that fits your room and values.”
Troubleshooting and Long-Term Care
Tackle common defects early so small repairs stay simple and the piece lasts longer. Prompt fixes protect the finish and keep the room functioning as intended.
Air bubbles, pinholes, and hairline cracks
Reduce air bubbles by tapping the mold with a mallet and vibrating the form during the pour. Rubbing a palm sander against the form helps shift trapped air to the surface before cure.
After demolding, fill pinholes with a matching slurry, let it dry, then sand flush with diamond pads so the surface reads even.
For hairline cracks, clean and dry the area, then work in a color‑matched patch. Once cured, apply a thin protective coat to lock out moisture and stains.
Everyday maintenance
Clean weekly using pH‑neutral products and soft cloths. Avoid acids, harsh solvents, and abrasive pads that can dull the finish.
Plan an annual reseal for a high‑use coffee table. A fresh coat refreshes stain resistance and extends the life of the top.
Moving and protecting
Design for moving with detachable metal legs, rounded edges, or bumpers to protect people and pets. For tops that weigh 100–130 lbs, lift with multiple people and use padded dollies for long carries.
Use concrete anchors for secure leg mounts and check holes and bolts periodically. Tighten hardware as part of routine furniture care to prevent wobble.
- Quick tips: vibrate forms to prevent voids; patch early to avoid larger repairs.
- Keep coasters, trays, and soft pads handy to protect the top from rings and hot cups.
- Maintain balanced room layout so the table stays accessible for cleaning and handling.
“Small, regular care beats major restoration.”
Conclusion
Close the project by confirming size, strength, and finish so the piece sits right in your room.
You turned design into a usable table by sizing to your living room and pacing each step. Follow the spec: ADA height 16–18 inches, melamine forms with 1″ reinforcement clearance, and a slow 48–72 hour covered cure.
Use bolted metal frames with cross supports and bracketed mounts so assembly stays simple. Finish wood with veneer edging, Minwax stain, and wipe‑on poly, then seal the top with two thin low‑VOC coats.
Handle heavy tops safely—standard slabs can weigh 100–130 lbs—use detachable legs, clean with pH‑neutral products, and reseal yearly to keep the tabletop looking fresh.