
Did you know that over 75% of homeowners who create custom furniture pieces report feeling more connected to their living spaces? This emotional connection transforms ordinary rooms into personalized sanctuaries.
Creating your own furniture centerpiece offers a unique opportunity to blend functionality with artistic expression. The epoxy material has revolutionized how people approach home decor projects, allowing for incredible design flexibility.
This comprehensive guide walks you through the entire creation journey. You’ll learn how to transform basic materials into a stunning focal point that reflects your personal style. The process combines practical woodworking skills with creative resin techniques.
Epoxy offers unmatched clarity and durability for furniture surfaces. It allows you to create everything from ocean wave effects to galaxy-inspired patterns. Understanding the material’s properties ensures professional results.
By following this approach, you’ll develop valuable skills while creating a piece that rivals store-bought furniture. The step-by-step method explains not just what to do, but why each action matters for success.
Key Takeaways
- Transform basic furniture into personalized artistic centerpieces
- Epoxy material provides exceptional clarity and long-lasting durability
- Learn professional techniques for working with liquid resin safely
- Create various design effects from ocean waves to cosmic patterns
- Understand critical factors like working time and curing requirements
- Develop valuable woodworking and resin application skills
- Achieve professional-quality results on your first attempt
Understanding Your DIY Resin Coffee Table Projects with Stunning Finishes
Before diving into construction, it’s essential to comprehend what makes epoxy-coated furniture so special. This knowledge ensures your project turns out exactly as envisioned.

Overview of the Project and Its Benefits
Your furniture piece begins as a substrate material that receives an epoxy finish. Many crafters choose creative approaches like deep-pour techniques. These methods allow embedding objects or adding colorful pigments.
Starting with a smaller furniture piece offers practical advantages. You need less workspace and materials than larger projects require. This approach lets you build confidence before tackling more complex creations.
The finished product provides both beauty and function. You gain a unique centerpiece that reflects your personal style.
How Epoxy Resin Enhances Your Table’s Appearance and Durability
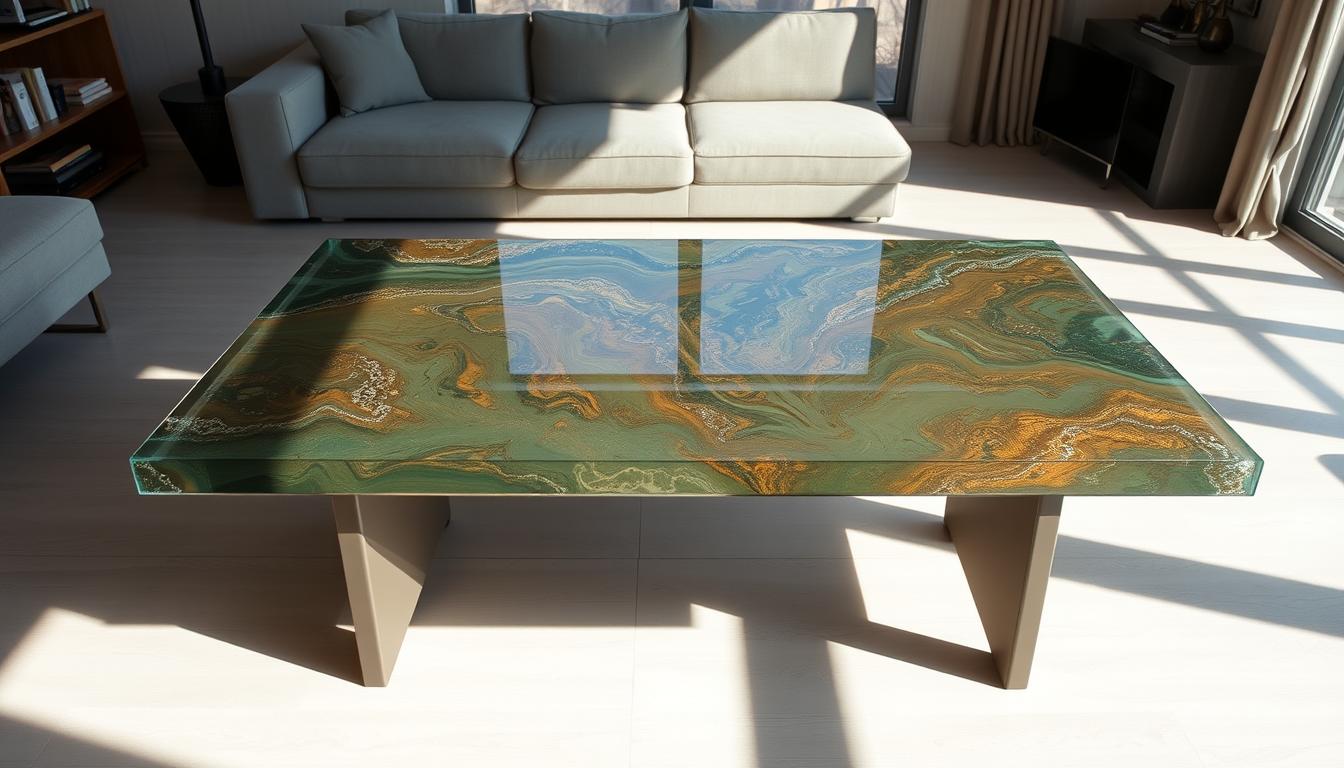
Epoxy creates a crystal-clear, glass-like surface that magnifies underlying materials. This clarity intensifies colors and patterns beneath the coating. The high-gloss finish adds visual depth to your design.
The protective qualities are equally impressive. Once cured, the surface becomes rock-solid and resistant to damage. It withstands daily use better than many traditional finishes.
| Feature | Epoxy Finish | Traditional Varnish | Lacquer |
|---|---|---|---|
| Surface Hardness | Extremely durable | Moderate | Good |
| Water Resistance | Completely waterproof | Limited | Fair |
| Maintenance | Easy wipe clean | Regular polishing | Frequent care |
| Visual Depth | High gloss clarity | Moderate sheen | Glossy finish |
Cleaning becomes simple with just mild soap and water. The non-porous surface prevents stains from setting in. Your creation maintains its beauty with minimal effort over time.
Customization options are nearly endless. You can achieve transparent effects or vibrant designs. The material adapts to various styles and preferences seamlessly.
Materials, Tools, and Supplies
Gathering the right components before starting ensures your project flows smoothly from start to finish. Proper preparation prevents costly mistakes and wasted time.
Essential Resin, Pigments, and Additives
Selecting the correct epoxy resin is crucial for success. Countertop formulas like Pro Marine Countertop Epoxy provide durable, food-safe finishes. You’ll need pigments in colors like turquoise, blue, and white for creative effects.
Don’t forget safety supplies like nitrile gloves and plastic drop cloths. Proper mixing requires graduated cups and stir sticks.
Wood, Legs, and Other Building Materials
Your foundation begins with quality wood materials. Plywood serves as the main surface, while 2×1 inch boards add reinforcement. Hairpin legs offer modern styling.
Wood glue and screws ensure sturdy assembly. Consider additional elements like sand or decorative items for embedded designs.
Recommended Tools for Cutting, Sanding, and Mixing
A complete toolkit makes the process efficient. Power tools like a jigsaw and drill handle cutting and assembly. Sanding equipment creates smooth surfaces.
Specialized tools like a heat gun and Bernzomatic torch perfect the finish. These items manipulate resin flow and remove air bubbles.
| Category | Essential Items | Optional | Purpose |
|---|---|---|---|
| Resin Materials | Epoxy, pigments, cups | Mica powders | Color and effects |
| Wood Materials | Plywood, legs, screws | Decorative elements | Structure and style |
| Safety Gear | Gloves, tape, drop cloths | Respirator | Protection |
| Specialty Tools | Heat gun, torch | Leveling tool | Finish quality |
“The right tools transform ambition into achievement.”
Organize your workspace with adequate ventilation. A dust-free area ensures perfect curing. Level surfaces prevent uneven resin distribution.
Preparing the Coffee Table Board
Accurate measurements and clean cuts form the backbone of your custom creation. This critical step ensures your finished piece will have professional quality and perfect proportions.
Measuring, Cutting, and Shaping Your Wood
Begin by determining the ideal size for your coffee table. Consider your available space and functional needs. Standard dimensions typically range from 36 to 48 inches long.
Use a circular saw to cut your wood to the desired size. Clamp a straightedge guide to ensure perfectly straight cuts. This precision prevents uneven surfaces later.

Mark leg placement by positioning hardware on the board’s underside. Trace around mounting plates and mark each screw hole location. This ensures symmetrical attachment and stable support.
Round the corners using a round object as a template. Carefully cut along these curved lines with a jigsaw. This creates comfortable, professional-looking edges.
Sanding, Rounding Corners, and Pre-drilling for Assembly
Thoroughly sand all cut edges and surfaces. Start with coarse 80-grit paper to remove saw marks. Progress to finer 220-grit for a smooth finish.
Use a router with a roundover bit to create beautifully finished edges. Adjust the depth to control how pronounced the rounded profile appears. This step removes sharp corners completely.
Pre-drill pilot holes for leg screws using a clever depth guide. Wrap painter’s tape around your drill bit at the correct depth. This prevents drilling through the board and ruining the top surface.
Proper preparation at this part of the process saves time later. Follow these instructions carefully to create a perfect foundation for your resin application.
Reinforcing and Assembling the Table Top
Proper reinforcement ensures your creation maintains its shape and durability over time. Longer pieces, especially those exceeding 36 inches, benefit from additional support to prevent sagging.

This critical step involves adding a support board underneath the main surface. Cut your secondary piece of wood slightly smaller than the top board. Position it carefully within the leg markings to avoid adding height.
Add a Support Board to Prevent Bowing
Apply a generous amount of wood glue across the entire support board. Spread it evenly for maximum bonding strength. The two layers of wood will create a sturdy composite structure.
Use clamps to secure the boards together. Distribute them evenly across the surface. You can supplement with scrap wood and weights for consistent pressure.
For enhanced functionality, consider adding sliding tray rails. Cut 1×2 boards to the required length. This part of the process creates hidden storage for living room items.
Pre-drill holes to prevent wood splitting. Secure the rails with screws. Use your tray components as spacers to ensure proper alignment.
Allow the glue to cure completely before proceeding. This step ensures your coffee table foundation remains solid. The reinforced structure will support the weight of the resin coating.
Your table assembly should now feel substantial and stable. The support board and potential rail system add both strength and utility to your coffee table project.
Painting and Priming for a Vibrant Backdrop
This creative stage allows you to establish the visual foundation for your epoxy masterpiece. Proper surface preparation ensures your colors pop with maximum intensity.

Creating a Beach and Ocean-Themed Base
Begin by thoroughly cleaning your entire surface. Use a damp cloth to remove all dust and debris from the working area. This step prevents imperfections in your final finish.
Apply tan color to one-third of the surface for your beach section. Divide the remaining area into three equal bands. Use progressively darker blue shades to mimic ocean depth.
Create a natural-looking shoreline with a wavy boundary between colors. This technique enhances realism when you add epoxy waves. Allow each coat to fully dry before applying the next layer.
Paint the underside with dark blue for a professional appearance. Include any sliding trays or visible components. Multiple thin coats provide better coverage than one heavy application.
Chalk-based paint offers excellent adhesion without extensive surface preparation. It dries quickly and provides a matte finish that complements epoxy beautifully.
Ensure your surface is perfectly level before proceeding. Check both front-to-back and side-to-side alignment. Proper leveling prevents uneven epoxy distribution.
Allow adequate time for the paint to fully dry, typically overnight. Rushing this step can compromise your entire project. Patience here ensures professional results.
DIY Resin Coffee Table Projects with Stunning Finishes
Mastering the application process transforms your prepared surface into a work of art. This phase demands precision and a clear understanding of material behavior.
Step-by-Step Resin Pour Techniques and Seal Coat Application
Begin by moving your piece to a temperature-controlled area. Pro Marine and similar formulas require stable conditions to cure properly. Cover your workspace with drop cloths because epoxy is messy and hard to remove once cured.
Your first critical step is the seal coat. Mix the epoxy according to the product instructions. Combine equal parts resin and hardener in clean mixing cups. Stir thoroughly for several minutes to ensure a complete chemical reaction.
Pour a thin layer of clear epoxy over the entire board. Use a trowel or heat gun to help the material flow into every corner. This initial coat seals the wood pores and prevents air bubbles from rising later.
Allow this layer to sit for about four hours. Cover the piece to keep it free from dust during this time.
Managing Working Times, Using Heat Gun and Torch
For the main pour, divide your mixed epoxy into several cups. Add pigments to create your desired color shades. Work efficiently as the material has a limited working time.
Apply your colors in the planned sequence. Use a heat gun to gently manipulate the epoxy and create effects like waves. Do not overheat the surface, as this can cause imperfections.
Once you are happy with the design, use a Bernzomatic torch. Pass it steadily over the surface to pop air bubbles. Hold the torch several inches away and keep it moving to avoid damaging the finish.
Carefully cover your creation and let it cure undisturbed. The full hardening process typically takes about 72 hours. Patience during this final phase ensures a professional, glass-like result.
Adding Finishing Touches and Assembling Components
This stage transforms your artistic creation into a fully functional centerpiece for your living space. The careful assembly process ensures your piece maintains its beauty and durability.
Attaching Hairpin Legs and Sliding Tray Rails
Begin the final assembly step by carefully flipping your fully cured piece face down onto a padded surface. Remove the Tyvek tape from the underside edges where epoxy drips collected.
If the tape doesn’t peel away cleanly, break the seal using a utility knife or sandpaper. Your hairpin legs attach through the pre-drilled pilot holes created earlier.
Align each leg carefully with the marked positions. Drive wood screws to the precise depth that secures them firmly without penetrating through to the finished top surface.
You could also choose alternative leg styles like tapered wooden legs or metal industrial pipes. Ensure whatever hardware you select can support the increased weight.
Final Curing, Bubble Removal, and Maintenance Tips
The sliding tray rails you installed earlier now receive their drawer components. Insert them from the front and test for smooth operation.
You need to work carefully when flipping the completed piece right-side up. Ideally, have a helper prevent dropping or damaging the edges.
Place it in its intended location and verify it sits level without wobbling. Your maintenance instructions should include keeping the surface clean with mild soap and warm water.
Avoid abrasive cleaners that could scratch the epoxy finish. The table could experience minor scratches over time, but these can often be buffed out.
You should sure keep your creation away from prolonged direct sunlight exposure. This prevents potential yellowing in some epoxy formulas.
Conclusion
Your journey in crafting a custom furniture piece has reached its successful completion. You have transformed basic materials into a unique and functional centerpiece for your home.
This creation stands as a testament to your personal style and effort. The skills you gained—from wood preparation to the final epoxy application—are now part of your toolkit.
Your finished work offers more than just a place to set things. It provides lasting durability and a beautiful surface that is easy to care for. The glossy tabletop resists stains and damage.
Feel confident to explore more creative endeavors. The techniques you mastered can be applied to many other home decor ideas. You have proven that with careful planning, anyone can achieve professional-quality results.
Enjoy the pride of creating something truly special. Your one-of-a-kind piece will be a conversation starter for years to come.