
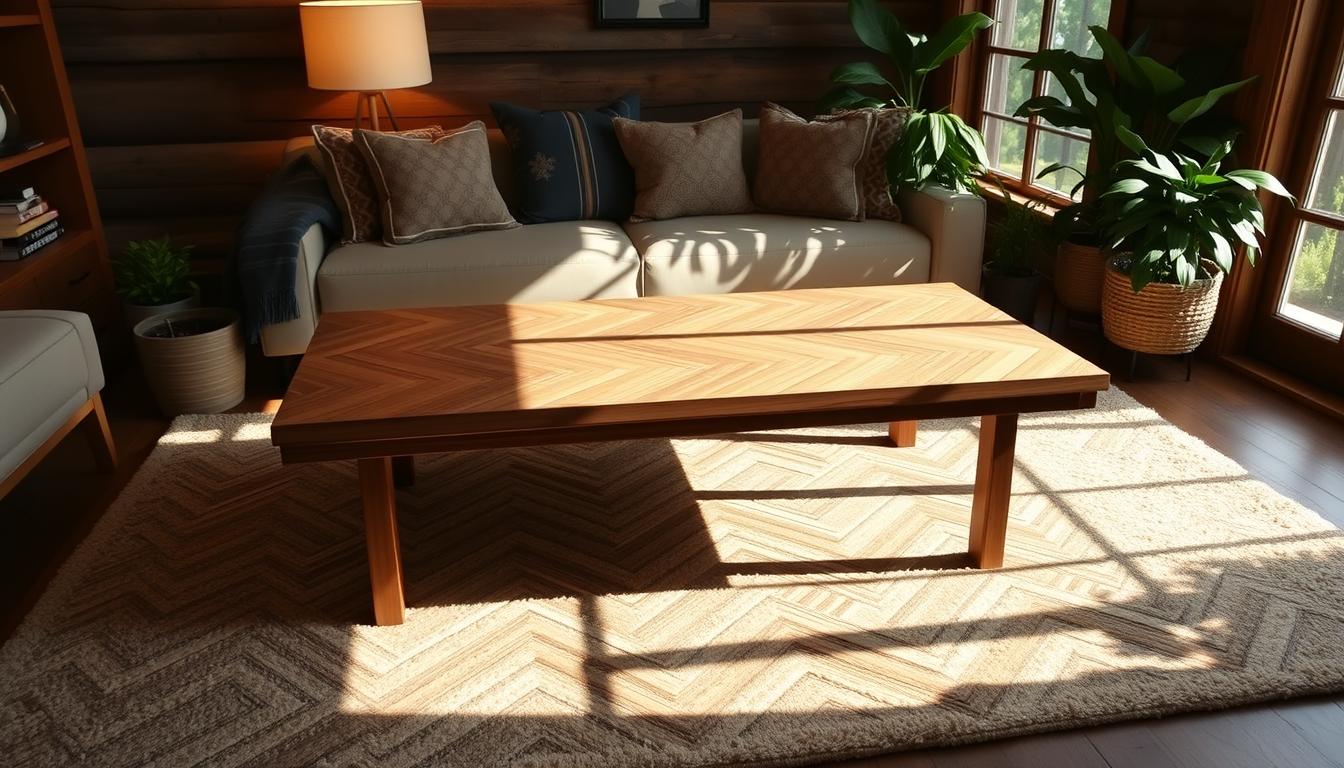
One surprise: a well-cut herringbone top can amplify tiny layout errors into obvious gaps, yet the same design raised living spaces more than 70% in perceived value when built carefully.
You’ll follow a clear, practical guide that showed makers how slower glue-ups—two to three rows at a time—cut filler use and produced crisp seams. Establishing a true centerline kept the look balanced, and choosing a thicker 1″ x 1″ square tube steel base (1/8″) gave a non-wobbly feel.
If you aim for a pro finish, use an oil-rubbed bronze spray on metal parts and a water-based hybrid satin varnish like Saman Stains on the top. Beginners often used 1×3 pine with pocket holes and off-the-shelf legs for a fast, reliable project that still looks custom.
Key Takeaways
- Plan precisely: a centerline matters for a balanced design.
- Glue-up slowly to reduce gaps and filler needs.
- Use thicker metal for a rigid, wobble-free base.
- Finish with water-based poly for fast drying and durability.
- Beginners can use pocket holes and pine for a quick, attractive build.
Plan your project: size, pattern direction, and living room fit
Kick off planning with a life-size guide so you can see how the top sits among seating and walkways. Make a cardboard mockup and mark the usable clearances before a single cut.
Choose dimensions that suit your seating layout. Measure from sofa edges and side surfaces, then convert those measurements into the final table size. This step helps avoid cramped furniture arrangements.

Set a true centerline
Draw a clear centerline on the guide and mirror pieces across it. A correct reference line prevents the herringbone coffee top from looking shifted after trimming.
Decide bold or tight layout
Pick wider 2″ x 1″ x 24″ slats for a bolder look or narrower stock for an intricate feel. Lay out several rows on the guide to count boards and save time and waste.
| Decision | Effect | Tool/Note |
|---|---|---|
| Full-size guide | Visual fit, less waste | Paper/cardboard mockup |
| Centerline choice | Balanced layout after trim | Measure twice, mark clearly |
| Overbuild & trim | Crisp edges, square corners | Track or circular saw final cut |
Tools and materials checklist for a smooth build
Assembling a practical kit of saws, clamps, and fasteners prevents frustrating delays later. Start by choosing the wood and substrate that match your budget and look. Pine boards with 1×2 trim suit beginners, while walnut or maple give a premium finish. Birch plywood works well for edge-grain tops.
Core cutting and shaping tools:
- Circular saw for perimeter cuts, miter saw for angles, and table saw or track saw for ripping stock.
- A 6″ random orbit sander with dust extraction improves finish speed.

- Pocket-hole jig, wood glue, and correct screws for secure assembly.
- If you choose a metal base, source 1″ x 1″ square tube steel (1/8″), cleaner, welder, primer, and oil-rubbed bronze spray.
| Category | Typical items | Why it matters | Quick tip |
|---|---|---|---|
| Wood & substrate | Pine, walnut, maple, birch plywood | Appearance vs. cost | Count boards and pieces before you cut |
| Saws & sanding | Circular saw, miter saw, table saw, sander | Accurate cuts speed the process | Keep spare blades and abrasives on hand |
| Joinery & hardware | Pocket holes, glue, screws, clamps | Strong joins reduce sanding and filler | Pre-fit pieces dry before glue-up |
| Metal base | Square tube, welder, primer, paint | Rigid base prevents wobble | Clean metal with mineral spirits before welding |
Build the tabletop: precise cuts, patient glue-ups, and clean edges
Start by laying a full-size paper guide on a flat surface and dry-fitting the pattern. This early mockup lets you count pieces and confirm the centerline before any cuts or adhesive.

Create a full-size guide and lay out the herringbone pattern
Dry-lay several rows so alignment stays true and the overbuilt area covers your final outline. Make sure diagonals read square before you move on.
Cut consistent pieces and assemble in small, controlled glue-ups
Rip stock on a table saw and crosscut on a miter saw so every piece matches. Work in small glue-ups—two to three rows per step—to keep open time manageable and seams tight.
Trim to final size, add bevels or roundovers for finished edges
Trim the perimeter with a circular saw and straightedge. Add a light 30° bevel or a 1/2″ roundover on the edges for protection and a polished look.
Flatten and sand: from rough leveling to a silky 220-grit surface
Flatten high spots with a plane, drum sander, or belt sander. Finish with a random orbit sander to 220 grit. If you used plywood edge-grain, apply full trowel filler to close micro-voids for a glassy surface.
| Step | Tool/Action | Why it matters |
|---|---|---|
| Full-size guide | Paper mockup, centerline | Confirms layout and piece count |
| Cutting | Table saw, miter saw | Consistent pieces lock pattern |
| Glue-up | Wood glue, clamps (2–3 rows) | Tight seams, manageable time |
| Trim & edge | Circular saw, router roundover | Clean edges, durable finish |
DIY Herringbone Coffee Table: Add Pattern And Style To Your Living Room
Decide early whether you’ll use simple pocket-hole joinery or pursue tighter tolerances with machine work.
Beginner-friendly route: pocket-hole assembly
Use 1×3 pine, a Kreg jig, and 1×2 edge framing. Build halves, join them, and secure side trim for a clean reveal. Sand in sequence: 60 → 80 → 120 → 220 for a smooth top.
Advanced options: precision and pro fillers
If you have a drum sander, push for stricter tolerances and faster flattening. Mix custom filler—example: 45/45/10 maple blend—to hide species shifts.
Plywood edge-grain approach
Cut 1.5″ x 3″ pieces and make “L” pairs into rows. Round the perimeter with a 1/2″ bit, then use a full trowel filler to close ply voids. This gives a high-impact top while staying budget friendly.
![]()
| Path | Key tools | Advantage |
|---|---|---|
| Beginner pocket-hole | Kreg jig, circular saw, sander | Accessible, low cost, fewer clamps |
| Advanced machine | Drum sander, custom fillers, tight jigs | Superior flatness, invisible fills |
| Plywood edge-grain | Router, trowel filler, consistent cuts | High impact look, budget top |
Choose your base: quick-install legs or welded metal trapezoids
Choosing between quick-install legs or a welded steel frame changes the tools, time, and finish you’ll need. Fast options get the piece usable in an hour while pro bases require layout, cutting, welding, grinding, and paint cure time.

Fast-install legs: Hairpin or industrial metal legs screw into solid areas under the top. Locate legs for even edge support and use a simple guide for equal setbacks. That keeps the table stable when someone leans from either side.
Pro welded base: Use 1″ x 1″ square tube steel (1/8″) for a rigid base. Clean mill oil with mineral spirits, tack with magnetic welding blocks, then finish weld. Drill access holes in lower braces, use 1″ spacers for a floating top reveal, and drive screws up into the top so the connection is secure but removable.
- Prime and spray oil-rubbed bronze for a forgiving finish.
- Install felt feet for floor protection and small stance tweaks.
- Plan time for layout, welding, and paint cure so the base matches the top’s quality.
| Option | Key features | Estimated time |
|---|---|---|
| Hairpin / industrial legs | Screws into underside; fast install; low tools | Under 1 hour |
| Welded square-tube base | 1″ x 1″ tube, magnetic blocks, access holes, floating reveal | Several hours + cure time |
| Finishing touches | Primer, oil-rubbed bronze, felt feet | Drying & adjustment time |
Finish like a pro: stain, filler, varnish, and durable paint
Small finishing choices control color, surface durability, and how seams disappear under raking light. A clear plan for filler, stain, and topcoat will save time and avoid rework.
Use filler strategically
Fill only tiny gaps with a thinned, color-matched store-bought filler (walnut tones work well). Reserve a full trowel filler for plywood edge-grain so the surface reads uniform.
Stain or keep it natural
Test stains on scraps and on single boards so you can dial in depth without surprises. You may skip stain if the natural wood look highlights the pattern and clean edges better.
Seal with fast, tough finishes
Choose a water-based polyurethane or a hybrid satin varnish like Saman Stains for quick dry times and strong protection. Sand between coats with a fine sander and progress to 220 grit for a smooth hand.
Prime and paint the base
Prime metal separately, then spray oil-rubbed bronze or flat black for a forgiving, refined finish. Wipe dust free between coats and respect dry and recoat times so the final surface cures without trapped solvents.
- Inspect every piece and seam under raking light and fix issues before the final coat.
- Consider a tinted clear (white oxide) in the topcoat to control warmth while keeping grain visible.
- Let the table cure fully before placing decor to protect the surface long term.
Conclusion
After steady work and careful checks, the finished top proved the slow, measured approach paid off. Patience in glue-ups, steady sanding with a sander, and mindful fills made the top read clean under raking light.
You followed a clear guide and broke the project into manageable steps, which saved time and reduced rework. Clean joinery, accurate piece layout, and the right screws kept the assembly sturdy for daily use.
Choose legs or a welded base for support, finish metal with oil-rubbed bronze, and fit felt feet for protection. At the end, you have a custom-feeling table that fits the room and sets a fast, repeatable way for future work.