
Surprising fact: a single 4′ x 8′ red oak plywood sheet can yield a 54″ top that safely spans a 51″ square ottoman, turning a soft surface into a stable living room center in one build.
You’ll learn practical steps from a real project that used Home Depot oak, a fine-tooth blade, and careful orientation of cuts to reduce splintering. The finished piece had 21″ tall legs and fit neatly over a large ottoman, giving you a stable surface without losing lounge comfort.
Finish choices matter: follow sanding (120 then 220 grit), apply red oak edge banding with an iron, condition, and stain with Varathane Espresso. For water resistance, add polyurethane. Or choose a soft top with 3″ high-density foam, batting, Loctite 300 spray adhesive, and fabric-covered buttons for tufting.
Safety and fit: plan size and clearance, use glue, clamps, and screws or pocket holes for hidden fasteners, and check that the top overhang and leg height suit your room.
Key Takeaways
- One 4′ x 8′ red oak plywood sheet can produce a large 54″ top for a 51″ ottoman.
- Cut oak with a fine-tooth blade and top face down to reduce splintering.
- Sanding 120 then 220 grit, edge banding, and Varathane Espresso bring a furniture-grade finish.
- Use polyurethane if you set drinks on the surface often.
- Upholstered tops use 3″ high-density foam, batting, and Loctite 300 for secure adhesion.
- Measure clearances and leg height so the piece fits your living room safely.
Plan Your Convertible Coffee Table-Over-Ottoman Setup
Start by measuring the ottoman and the room so the top slides on easily without scraping floors or blocking paths. Confirm the ottoman size and height, then allow an extra inch or two per side so the sleeve removes without catching.
Select materials and fasteners. Use 3/4″ plywood for a rigid top. Red oak looks premium and takes stain well, but it splinters—use a fine-tooth blade and cut the show face down. Choose wood screws for strength or pocket holes for hidden joins. Pick a staple gun that will hold upholstery through plywood and tack strips.

Safety and logistics. Set up sawhorses, blade guards, goggles, and ear plugs before you work. Plan store ripping or transport so one 4′ x 8′ sheet becomes manageable pieces. Block time for glue and stain dry times in your project schedule.
| Item | Recommended | Why |
|---|---|---|
| Plywood | 3/4″ Red Oak | Stain-grade, rigid top |
| Blade | Fine-tooth | Reduces tear-out on oak |
| Fasteners | Wood screws / Pocket holes | Strength vs. hidden finish |
| Upholstery | Heavy-duty staple gun | Secure foam and fabric |
DIY Coffee Table Over Ottoman: How To Create A Convertible Setup
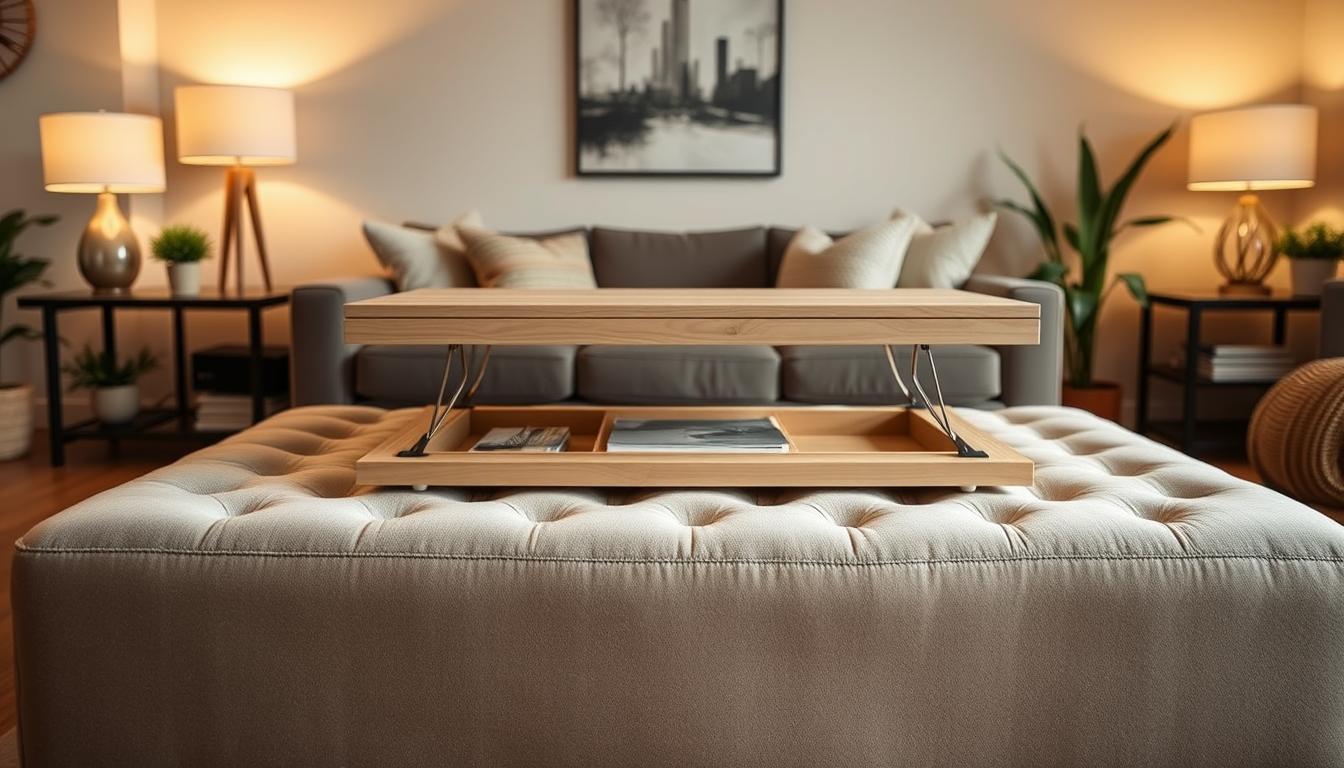
Start smart: cut your red oak 4′ x 8′ sheet into two 2′ x 8′ pieces and lay out a 54″ top. Dry-fit the top and the sleeve’s vertical panels over the ottoman to confirm clearance and even bottom contact.
Cut clean edges: use a high-tooth-count, shallow blade and run the show face down to prevent tear-out. Lightly ease sharp edges before applying iron-on edge banding so the adhesive grabs uniformly.

Joinery options: align pieces with corner clamps and glue (Liquid Nails) first, then reinforce with wood screws. For a hidden look, drill pocket holes on underside panels and use pocket screws from the inside faces.
Soft top alternative: trim 3–4 inch high-density foam with an electric knife, adhere with Loctite 300 spray adhesive, then add hi-loft batting. Mark tufting points with a straightedge grid, cut small slits, and secure tufts with #8 screws and #10 washers. Use a laser level to keep staple lines straight when attaching fabric with a staple gun.
| Task | Recommended | Why |
|---|---|---|
| Top cut | 54″ red oak plywood | Fits a 51″ ottoman with slight overhang |
| Blade | Fine-tooth / shallow | Reduces oak splintering |
| Assembly | Liquid Nails + corner clamps | Locks alignment before screws |
| Upholstery | Loctite 300 + staple gun | Secure foam and fabric evenly |
Finishing Touches: Wood, Upholstery, and Protection Options
A clean finish and crisp upholstery details turn raw plywood into a living-room focal point. Start by iron‑on edge banding across the plywood layers so the edge looks furniture-grade. Trim and sand the banding lightly until it blends with the top.

Stain, sanding, and seal
Sand the assembled piece at 120 grit, then follow with 220 grit. Remove dust with a tack cloth so stain goes on evenly.
Apply wood conditioner before staining to prevent blotches. Test stains and consider Varathane Espresso for a deep tone on red oak.
Seal the surface with polyurethane when you expect drinks and daily wear. This step adds water resistance and ease of maintenance.
Tufting, piping, and upholstery details
For tufting, mark a straight grid, cut short slits in the foam and batting, then press the upholstery fabric into each hole. Drive #8 screws with #10 washers from underneath to lock tufts, then cover fasteners with fabric buttons.
Use tack strips along the top edge of the sides so the fabric drops straight and hides staples. Choose premade piping for speed or make DIY cording with a piping foot for a perfect match. Overlap ends by trimming the inner cord and folding the fabric for a neat finish.
- Double-check fabric alignment at every step so stripes and seams stay square to the top and sides.
- Inspect bottom edges and mark feet locations so the piece sits level and slides over the ottoman without catching.
- Make sure tufting holes and screws are placed in a way that protects the foam and preserves the fabric integrity.
Pro Tips, Sizing Tweaks, and Troubleshooting
Small adjustments make big differences. Follow a few targeted steps and you’ll avoid common pitfalls with oak plywood, upholstery fabric, and the base that carries the top. These tips help you finish a secure piece that slides over the ottoman and still looks refined in the room.
Right blade and cut orientation
Choose a shallow, high‑tooth-count blade and cut with the show face down to minimize tear-out on oak plywood. For extra insurance, score the cut line or lay painter’s tape across corners before cutting.
Hide fasteners and finish seams
Liquid Nails plus wood screws give durable joints, but pocket holes keep screw heads out of sight. If you must fill holes, test wood filler with your stain first—filled spots can take color differently and telegraph under finish.
Keep fabric straight and crisp sides
Establish a centerline, use a laser level for staple lines, and pull fabric evenly across opposite sides in small steps. Tack strips produce crisp sides and prevent staples from showing on patterned upholstery fabric.
Stability, clearance, and reinforcement
Set safe overhang limits and confirm leg height so the piece centers over the ottoman without tipping. Reinforce the base with 2×2 rails and a 2×4 stretcher, and pre‑install leg blocks where feet or threaded legs will attach.
- Minimize tear-out with the right blade and cut orientation.
- Hide screws with pocket holes; test filler and stain on scrap wood.
- Use a laser level and tack strips for straight staple lines on upholstery fabric.
- Pre‑plan feet placement and internal supports so the base resists racking.
Conclusion
A completed 54″ red oak top and tidy upholstery work show that careful planning pays off. The measured steps you followed — cutting with the show face down, using Liquid Nails plus screws or pocket holes, sanding, edge banding, and the option of 3–4″ high-density foam with batting — deliver a polished piece for your living room.
, You balanced comfort and durability by choosing the right wood or fabric path and by reinforcing the base, legs, and feet so the top sits true over the ottoman without rubbing or tipping.
Take the time to dry-fit, let glue and finish cure, and check corners and bottom clearance before final placement. When you’re ready, use the post-build links for materials and tools and enjoy this practical project in your room.