
Did you know that the average American spends over two hours each day in their living room? That’s a significant amount of time spent with your furniture. Your coffee table is often the centerpiece of this space.
Choosing the right supports for your furniture is a powerful step. It allows you to create a piece that truly reflects your personal style. This is where a hands-on project can make a huge difference.
You can transform a simple tabletop into a stunning conversation piece. The right design can completely change the look and feel of your entire room. This guide will show you how.
We will explore various materials and styles. You will learn how to achieve a specific aesthetic, from modern to rustic. The goal is to help you build something unique and personal.
Key Takeaways
- Customizing your furniture’s supports can dramatically change its overall appearance.
- This hands-on project gives you full control over the final style of your piece.
- The right design choice serves both a structural and decorative purpose.
- You can create a unique centerpiece that reflects your personal taste.
- This endeavor is suitable for various skill levels with the right guidance.
- Simple changes in material or shape can elevate a basic item into something special.
Introduction to Custom Coffee Table Legs
Custom supports offer more than structural integrity—they become the defining feature that expresses your personal aesthetic. The right choice transforms a basic surface into a complete furniture piece that reflects your unique taste.

Understanding the Value of Custom Legs
Personalized supports provide significant advantages beyond basic function. They allow you to create harmony with your existing room decor. You gain control over proportions to ensure perfect fit.
This approach results in a unique centerpiece rather than a generic store purchase. Your selection impacts both appearance and long-term durability of the finished piece.
Inspiration from Modern and Rustic Designs
Contemporary styles feature clean lines and minimalist appeal. Think sleek metal frames or industrial pipe constructions. These create a sophisticated, urban look.
Rustic approaches embrace natural materials and textured finishes. Reclaimed wood or chunky turned legs add warmth and character. Many enthusiasts blend styles for eclectic results.
| Feature | Modern Style | Rustic Style |
|---|---|---|
| Primary Materials | Steel, aluminum, chrome | Reclaimed wood, natural timber |
| Visual Characteristics | Clean lines, geometric shapes | Textured surfaces, organic forms |
| Room Compatibility | Urban lofts, contemporary spaces | Farmhouse, traditional settings |
| Finish Options | Polished, powder-coated | Weathered, stained, natural |
Materials and Tools You Need for Your Coffee Table Project
Success in any hands-on endeavor starts with thorough preparation. Gathering the right components before you begin is crucial for a smooth workflow. This prevents interruptions and ensures a high-quality result.
Having a complete set of materials and tools transforms the building process from frustrating to enjoyable. A well-planned trip to the hardware store saves valuable time later.
Essential Materials Overview
Your material selection forms the foundation of your furniture piece. The specific materials depend on your chosen design, whether it features chunky wood or sleek steel elements.

- Structural Components: Dimensional lumber like 2x4s or 2x12s, and metal pipes or bars.
- Connection Hardware: Pocket screws, metal angle braces, and pipe fittings for stability.
- Finishing Products: Wood conditioner, stain, and a protective topcoat like polyurethane.
- Adhesives & Fillers: Quality wood glue and filler for seamless, strong joints.
Tools for a Professional Finish
The correct tools elevate your work from amateur to expert level. Precision cutting and joining are non-negotiable for a stable, beautiful final product.
Essential items include a table saw for accurate ripping and a miter saw for clean crosscuts. A pocket hole jig creates incredibly strong, hidden joints. Don’t forget an orbital sander and a reliable drill.
Clamps are your best friend during assembly, holding everything securely. Investing in these tools pays off by making your projects look store-bought.
Planning Your DIY Coffee Table Build
A thoughtful plan is the foundation of any successful furniture project. It ensures your final piece fits both your space and your lifestyle perfectly.

Design Considerations for Room Style and Function
Your first step is to assess your living area. Look at the existing style, color palette, and other furniture. Your new coffee table should complement this environment, not clash with it.
Functional needs are just as important as aesthetics. Consider the size of your room and how people move through it. Think about your seating arrangement and how you will use the surface daily.
Height is a critical design factor. A standard coffee table is typically 16 to 18 inches high. For the best proportion, measure your sofa’s seat height and subtract a few inches.
The table below helps you align your design choice with your room’s needs.
| Consideration | Style Impact | Function Impact |
|---|---|---|
| Overall Shape | Defines modern, rustic, or transitional feel. | Affects traffic flow and accessibility from seating. |
| Leg Proportion | Thick legs suit chunky tops; slender legs offer a light look. | Ensures stability and visual balance for the piece. |
| Surface Area | Influences the table’s visual weight in the space. | Determines utility for holding drinks, books, or decor. |
Setting Your Project Timeline
Setting a realistic project timeline prevents frustration. A diy build involves several phases, each requiring time.
Allocate one to two days for initial planning and design. Gathering materials may take another day. Construction and assembly often require a weekend.
Do not rush the finishing process. Applying stain, sealant, and allowing for drying can take two to five days. Patience here ensures a professional, durable result.
DIY Coffee Table Legs: Creative Ways to Customize Your Build
Choosing between wood and metal for your project’s base opens up distinct aesthetic paths. This decision impacts the final piece’s weight, durability, and overall feel.

Exploring Wood versus Metal Leg Options
Wood brings a sense of warmth and traditional charm. Species like oak offer exceptional strength for high-use pieces. Softer woods like pine are easier to shape for unique profiles.
Reclaimed timber adds instant history and character. Each piece tells a story with its unique grain and imperfections.
Metal provides a sleek, modern, or industrial vibe. Hairpin styles offer a light, mid-century look. Black iron pipe constructions make a bold, urban statement.
Consider these factors when deciding:
- Weight: Metal is often heavier, adding stability.
- Durability: Hardwoods are tough; metal resists scratches.
- Ease of Build: Pre-made metal kits simplify assembly.
- Maintenance: Wood may need occasional refinishing.
Unique Finishing Touches to Reflect Your Style
The final surface treatment is where your piece becomes truly unique. This step allows you to harmonize with your room’s decor.
Consider a two-tone paint treatment for a dynamic look. A distressed finish can impart a sense of age and history. Contrasting stains on different elements create visual depth.
Decorative details like tapered profiles or geometric cutouts add sophistication. The finish—from a natural oil to a high-gloss lacquer—seals your style choice.
Step-by-Step Guide to Assembling Your Table Base
Moving from planning to assembly marks the exciting transition where your vision takes physical form. This phase requires careful attention to detail for a professional result.

Constructing the Tabletop and Shelf Panels
Begin by cutting your boards to the desired length. Prepare edges for seamless joining using a router or planer. This ensures flush connections between pieces.
Pre-drill pocket holes along board edges at 6-8 inch intervals. Apply wood glue to all mating surfaces before clamping. Clean excess glue immediately for a clean finish.
| Assembly Method | Pocket Hole Technique | Steel Reinforcement |
|---|---|---|
| Best For | 1×6 boards, hidden joints | 2×12 lumber, heavy tops |
| Strength Features | Internal screw connections | External metal bracing |
| Clamping Time | Immediate screw fastening | Overnight glue setting |
| Visual Result | Clean, invisible fasteners | Industrial underside look |
Building the Supportive Box Structure
Create the frame by attaching side pieces to your tabletop. Work upside-down for easier access to connection points. Pre-drill holes at each end for secure attachment.
Make sure to verify square corners by measuring diagonals. Equal measurements confirm proper alignment. This prevents wobbling in the finished piece.
“Measure twice, cut once” applies equally to assembly—check alignment at every step for furniture that stands straight and true.
Add steel brackets or punched flat bar for extra stability. This hardware prevents warping in larger surfaces. Complete the structure by adding the lower shelf panel.
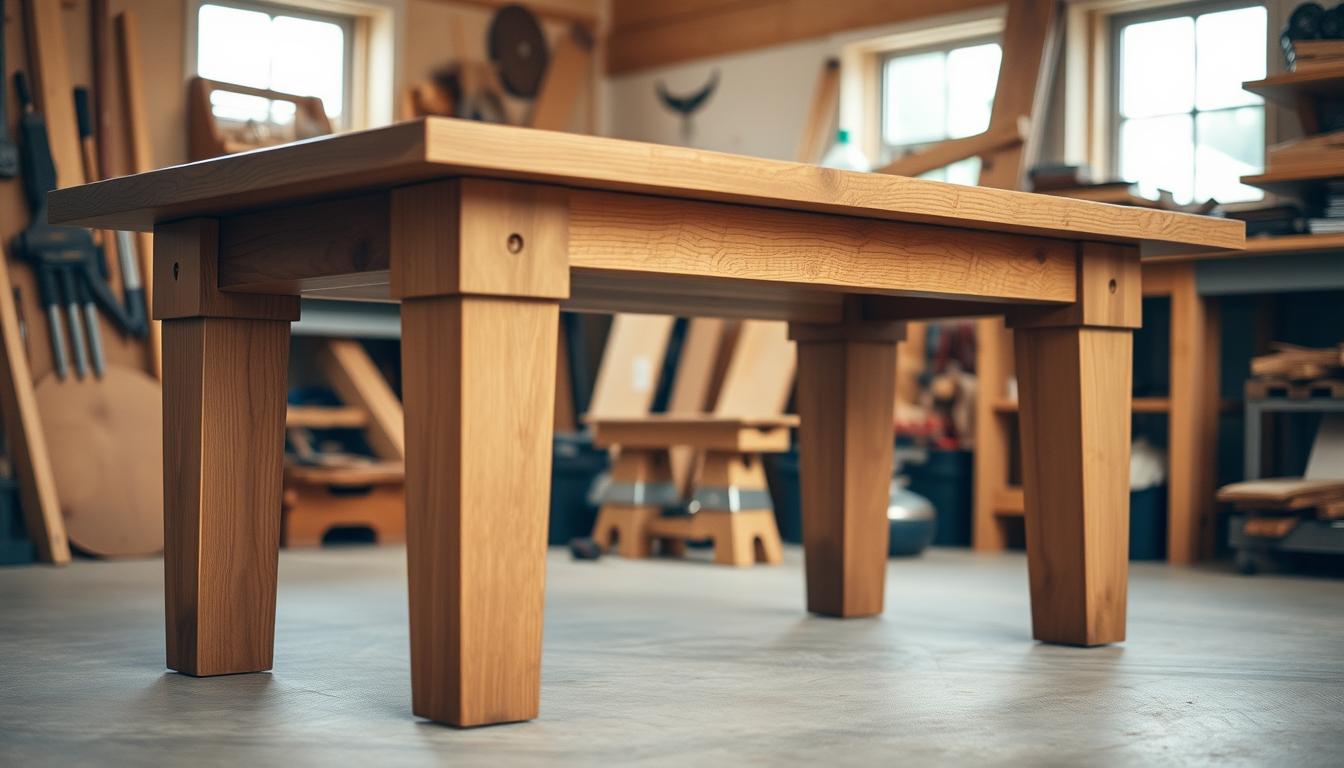
Creative Wood Leg Designs for a Classic Look
The timeless elegance of wooden supports brings a warmth to any room that metal simply cannot replicate. Natural materials create an inviting atmosphere through their organic textures and rich grain patterns.

Working with timber allows for endless customization possibilities. You can achieve everything from sleek modern profiles to substantial rustic designs.
Rustic Farmhouse Appeal with Reclaimed Wood
Reclaimed materials offer authentic character that new wood cannot match. Barn beams and architectural salvage bring historical charm to your project.
Oak provides exceptional durability for high-traffic pieces. Its prominent grain patterns withstand daily use beautifully. Pine offers a softer, more workable alternative for custom shaping.
| Wood Type | Best For | Character | Workability |
|---|---|---|---|
| Oak | Dining tables, farmhouse pieces | Strong grain, traditional | Requires sharp tools |
| Pine | Side tables, custom shapes | Soft texture, warm | Easy to cut and shape |
| Reclaimed Barn Wood | Rustic coffee tables, consoles | Weathered patina, unique | Variable, often dense |
| Baluster Legs | Ready-made vintage styles | Turned details, classic | Pre-shaped, install ready |
X-shaped bases from reclaimed timber create dramatic visual interest. Combining old wood legs with new tops achieves an intentional collected look.
This approach results in a unique centerpiece full of character. Your finished piece will tell a story through its materials and design.
Modern Metal Leg Inspirations for a Sleek Finish
The clean lines of metallic bases create visual lightness while providing robust structural support. These contemporary options transform ordinary furniture into statement pieces with industrial charm or minimalist elegance.

Using Hairpin and Industrial Pipe Legs
Hairpin designs remain a top choice for mid-century modern enthusiasts. Their slender rod construction offers minimal visual weight while maintaining excellent stability. These metal legs work beautifully with various tabletop materials.
Industrial pipe configurations provide rugged, masculine appeal with incredible versatility. Black iron plumbing components assemble into X-shapes, H-frames, or straight posts without welding. Threaded fittings allow for easy customization and adjustment.
Welded steel options deliver ultimate strength and geometric creativity. You can fabricate trapezoid shapes or clean rectangular frames for a professional look. This approach works well for heavier surfaces that demand solid support.
Ready-made metal table legs save time while achieving polished results. Online retailers offer hairpin, diamond, and tapered styles with metal feet. These pre-fabricated options simplify your project significantly.
Modern finishes include matte black for dramatic contrast and brushed steel for industrial chic. Copper accents bring warmth to metallic bases, while chrome suits ultra-contemporary spaces. The sleek profile prevents furniture from overwhelming smaller living areas.
Tips for Accurate Measurements and Level Stability
Precision in measurement is the unsung hero of a successful furniture project. Getting the dimensions right from the start prevents frustrating issues like wobbling or poor proportions later. A stable, level final piece depends entirely on your initial calculations.

Determining Table Height and Leg Proportions
Your first critical step is calculating the final height. You must add the length of your supports to the thickness of your top. For example, 18-inch legs plus a 1.5-inch surface create a 19.5-inch tall table.
Standard coffee table height falls between 16 and 18 inches. This positions the surface comfortably below your sofa’s seat. The visual balance between the leg and top size is crucial for stability.
Visualizing the final size is a powerful step. Lay painter’s tape on your floor to outline the footprint. This helps you confirm the piece will fit your space perfectly before any cutting begins.
| Leg Style | Cutting Technique | Component Details | Proportion Goal |
|---|---|---|---|
| X-Leg Design | Miter saw at 45° with stop block | 4 long pieces, 4 short pieces | Angles meet perfectly for symmetry |
| Chunky Leg Design | Straight cut to desired length | 8 pieces from 2x12s, paired for 4 legs | Substantial legs to match a heavy top |
Make sure to test for wobble on a level surface after dry-fitting the components. Uneven leg lengths are a common cause of instability. This final check ensures your creation is both beautiful and functional.
Finishing Techniques: Staining, Sealing, and Detailing
Applying the right finish elevates your furniture piece from functional to exceptional, protecting it for years of enjoyment. This stage brings out the natural beauty of your materials while adding durable protection.
Choosing the Right Stain, Oil, or Polyurethane
Your stain choice dramatically affects the final appearance. Dark espresso creates rich traditional appeal, while semi-transparent black offers contemporary style with visible grain.
Proper surface preparation is critical for even stain absorption. Sand progressively from 120-grit to 220-grit using an orbital sander. Remove all dust between grits for a smooth foundation.
When working with pine, apply wood conditioner 30 minutes before staining. This prevents blotchy absorption and ensures even color distribution across your tabletop.
For sealing, Danish oil provides easy application with excellent results. Simply rub it on with a cloth and repeat for 2-3 coats. This creates a natural low-sheen appearance.
Polyurethane topcoats offer superior protection for surfaces exposed to moisture. Three coats provide durable defense against daily wear while maintaining your stain’s beauty.
Final Assembly and Adjustment Tips
Center your base under the tabletop before fastening with pocket screws. Use 90-degree metal angle brackets for secure leg attachment to the underside.
Test that all legs are level before tightening all hardware. This ensures stability and prevents wobbling in your finished piece.
Fill any gaps or imperfections with wood filler before finishing. For color-matched solutions, mix wood glue with sawdust from your project.
Allow adequate drying time between coats—typically 2-4 hours for stain and 4-6 hours for topcoats. Full cure time before use ensures maximum protection.
Conclusion
The personal fulfillment from crafting your own home furnishings extends far beyond the finished product. You’ve explored comprehensive techniques that transform ordinary builds into extraordinary custom furniture reflecting your unique style.
Building your own coffee table provides satisfaction that goes beyond simply acquiring furniture. It’s about creating a distinctive piece that tells your story and fits your living space perfectly.
The skills gained through these projects empower you for future endeavors. Your completed tables become conversation starters that showcase craftsmanship impossible to find in stores.
Remember that every diy coffee table project is a learning experience. The investment of time pays dividends in pride and creative fulfillment, making your creation genuinely special.