
Surprising fact: many dining tables sit around 30 inches tall, and one 28-inch table was raised to just over 30 inches in under an hour with basic tools and a few parts.
You want a quick, stable change that suits your room and daily use. Start by measuring current size and target height. Then pick a path that matches your budget and available time.
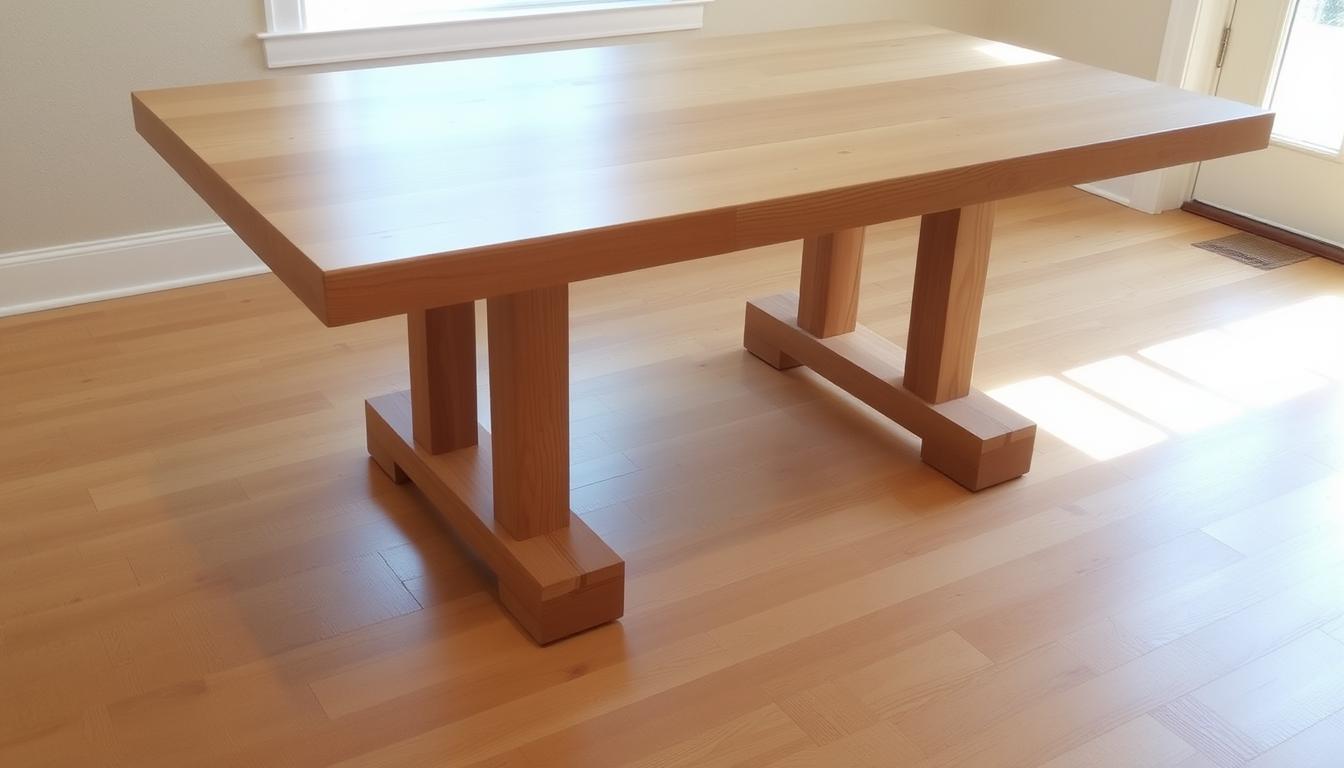
Fast fixes like bed risers or slip-on PVC sleeves lift each leg in minutes. For a refined result, threaded bun feet and 5/16″-18 tee nuts were used, then painted with Sherwin-Williams to match the top. That route took about 10 minutes of hands-on work and roughly 45 minutes including paint and drying, with no wobble even with a 6’3″ guest.
Consider adjustable legs if you need variable height. Think about stability, clearance for chairs, and the final look so the furniture blends into your space.
Key Takeaways
- Measure current and desired height before you begin.
- Choose risers for speed or threaded bun feet for a seamless look.
- Paint or wrap added pieces so the finish matches the room.
- Test stability after installation to avoid wobble.
- Adjustable legs offer sit-or-stand flexibility and added storage space.
Plan the perfect height: measuring, ergonomics, and safety for your DIY project
Start by deciding the final height you need and checking how it fits your chairs and room layout. Typical dining height targets near 30 inches; raising a 28-inch top by just over 2 inches restored comfortable seating in many cases.
Measure floor-to-top on each corner and confirm knee clearance for the center seating area. Mark the exact center on each leg by measuring diameter and drawing crossing lines before any drill touches wood or metal.
Tools and materials checklist
- Drill, matching bit, hammer, and clamps
- 5/16″-18 tee nuts and 5/16″ bit for 1/3″ depth predrill
- Bun feet, risers, slip-on PVC sleeves, 100-grit sandpaper
- Paint or stain, brush, and safety gear (eye protection, gloves)
- Verify riser weight rating and material match with your furniture
Keep safety front-and-center: wear eye protection, support the top when flipping, and stop drill depth short of penetrating through the leg.

| Item | Purpose | Tip |
|---|---|---|
| 5/16″ bit | Predrill for tee nuts | Set depth to ~1/3″ and test on scrap |
| Tee nuts | Secure bun feet or threaded extensions | Hammer flush, then sand and paint |
| Slip-on PVC | Lift round metal legs quickly | Match internal diameter to leg size |
| Bed risers | Instant lift | Choose rated set based on table weight |
Fast ways to add inches: simple, reversible solutions for any room
If you need inches added fast, pick a reversible method that won’t damage your furniture. These choices work across styles and let you test a new height without commitment.

Bed risers and leg extenders slide under each leg for an instant lift. Choose a set with a weight rating higher than your table and daily load. Paint risers to match the legs so they blend into the finish.
Slip-on PVC sleeves for metal or folding tables
For round metal legs, cut four equal lengths of PVC pipe sized to the leg diameter. Slip them over each foot so every corner rises evenly. Test one leg first to confirm a snug fit.
- You get an immediate height boost without drilling or permanent change.
- Make sure risers sit flat and the leg fits securely to avoid wobble.
- These methods are reversible—ideal when you rent or reconfigure a room.
- Check store specs for load capacity and leg profile before purchase.
- Verify final stability on a level surface and re-seat any riser that isn’t fully engaged.
Safety matters: lift with help if needed, set each leg fully into its riser cup, and confirm even height so chairs and guests have proper clearance.
How To Make A Table Taller DIY: Creative Solutions For Perfect Fit
Flip the furniture and measure each leg carefully; accurate centers prevent misaligned holes.
Mark centers and predrill
Measure leg diameter, draw two crossing lines, and mark the center. Use a 5/16″ bit and set depth to about 1/3″ so the barrel fits without breaking through.
Install tee nuts and extensions
Hammer 5/16″-18 x 3/8″ nail-in tee nuts flush. Thread in bun feet or wood pieces with hanger bolts and tighten until the end seats firmly.

Attach, level, and test
Flip the piece upright and check for wobble. Adjust or re-seat any leg until the new height is stable and near dining standard.
Paint, stain, and finish
Remove feet, sand joint areas with 100-grit, and fill gaps with wood filler if needed. Use painter’s tape and cups to speed drying, then reinstall and test load capacity.
| Step | Key action | Tip |
|---|---|---|
| Mark center | Measure diameter, draw crossing lines | Start drill exactly on intersection |
| Predrill | 5/16″ bit, ~1/3″ depth | Test depth on scrap wood first |
| Install hardware | Hammer tee nuts, thread feet | Tighten until snug; avoid over-torque |
| Finish | Sand, paint or stain, reattach feet | Use matching Sherwin-Williams color if needed |
Go further: replace legs or use adjustable table legs for custom height and storage space
A leg swap can convert an old top into a versatile desk with room for carts and wire shelving. Measure the tabletop and mark even mounting points before you start. Pre-drill clean holes with the correct bit, add wood glue at each joint, then fasten screws and let the glue cure before flipping the piece.
Swap to new legs
Choose wood or metal legs that match the load and look of your furniture. Use a consistent pattern so the table stays square and each leg supports weight evenly.
IKEA OLOV adjustable legs
OLOV legs dial tabletop height between 23⅝ and 35⅜ inches, enabling sit‑stand use. Pair four OLOV legs with a LINNMON top for an affordable desk near $100. Trim or vinyl-wrap the tabletop to change color and overall look without refinishing.
Smart add-ons for storage
- Raise the table to slide a rolling cart like RÅSKOG or a Michaels Recollections unit under the area.
- Add removable under-desk wire shelves for papers, canvases, and tools.
- Verify hardware size and material so holes align and the set holds over time.
| Upgrade step | Action | Tip |
|---|---|---|
| Measure & mark | Even points on underside | Confirm clearance at each end |
| Predrill | Correct bit size, steady drill | Test on scrap wood first |
| Fasten | Glue then screw, cure time | Tighten bolts; recheck height in inches |
Conclusion
Practical, with measured choices and the right supplies, you can raise height and keep a cohesive look across your home. Quick fixes like bed risers or PVC sleeves give fast, reversible lifts while tee-nut and bun-foot installs offer a durable, painted finish that matches the tabletop.
Adjustable IKEA OLOV legs widen the range and free up space under the table for carts or shelves. Sand with 100-grit, match color with paint or stain, and always check each leg for solid contact before everyday use.
Plan your time, stage supplies, and test stability. With care and basic safety, you’ll end with a tailored piece of furniture that fits your living and dining room and stands up over time.